


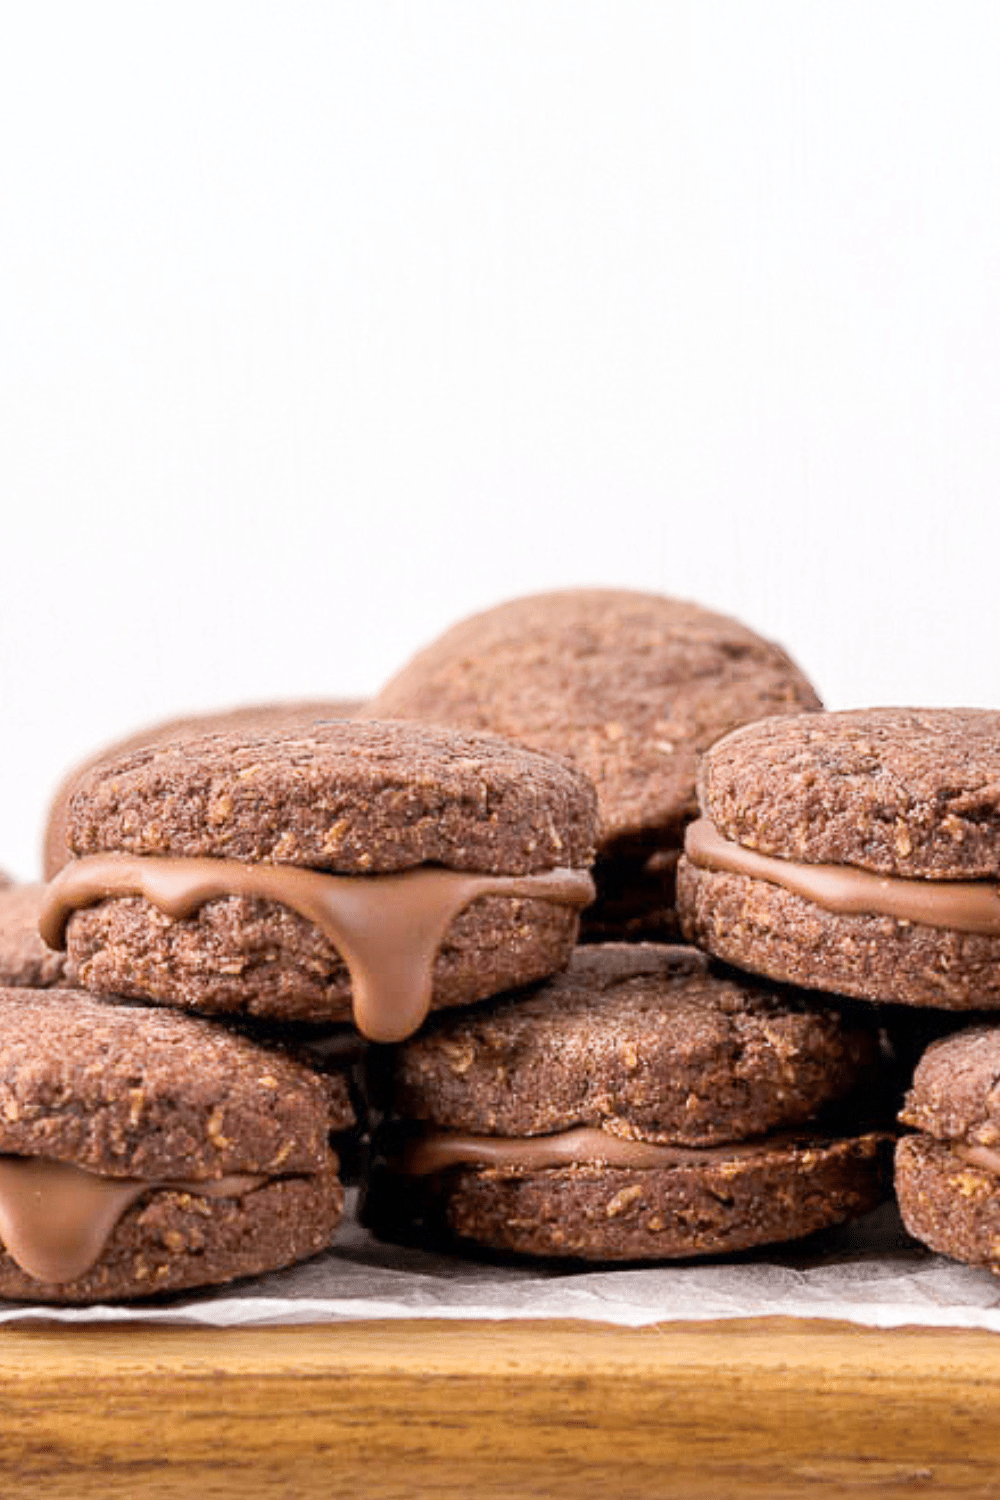
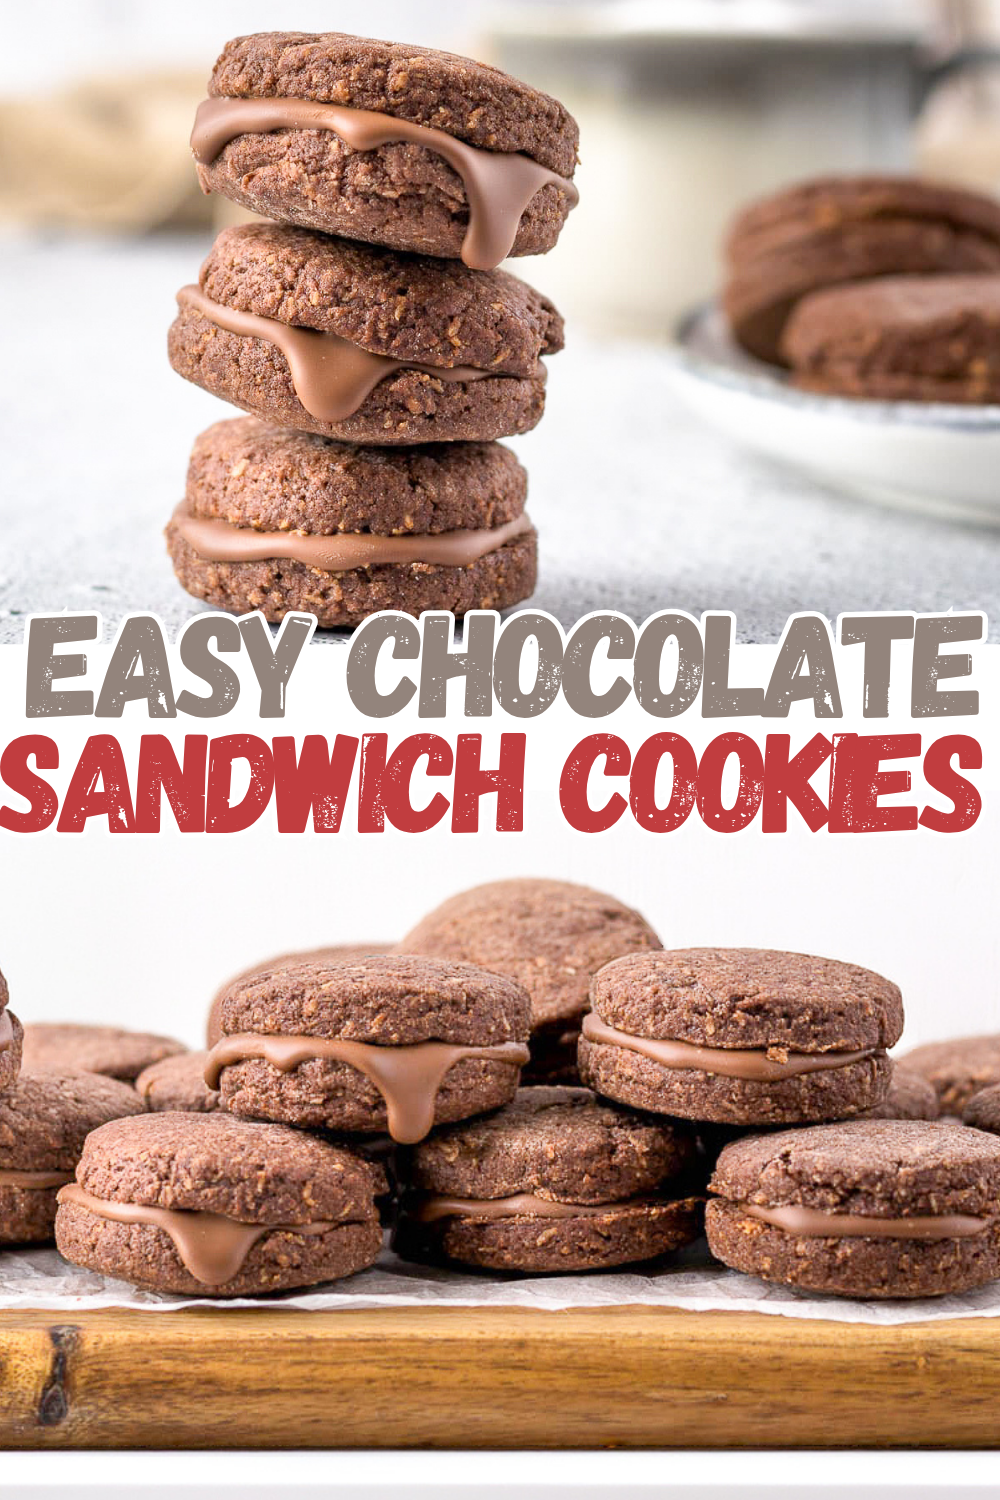
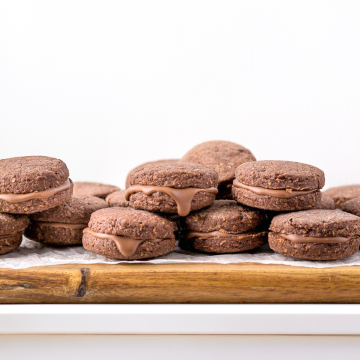
If you are a chocolate lover, these Double Chocolate Sandwich Cookies are going to become a regular in your baking rotation. Two soft, fudgy cocoa cookies sandwiched around a smooth milk chocolate ganache — rich, chewy, and way better than anything from a packet. Perfect for holiday cookie boxes, bake sales, birthdays, or a weekend bake when you want something a little special.
Easy Chocolate Sandwich Cookies
What I love about this recipe is how well the two components balance each other. The Dutch-process cocoa cookies are deep in flavor without being too intense, which lets the milk chocolate ganache filling shine. If you have never made ganache before, don't be put off — it is just warm cream and good chocolate stirred together, and it makes all the difference.
What You'll Need to Cook
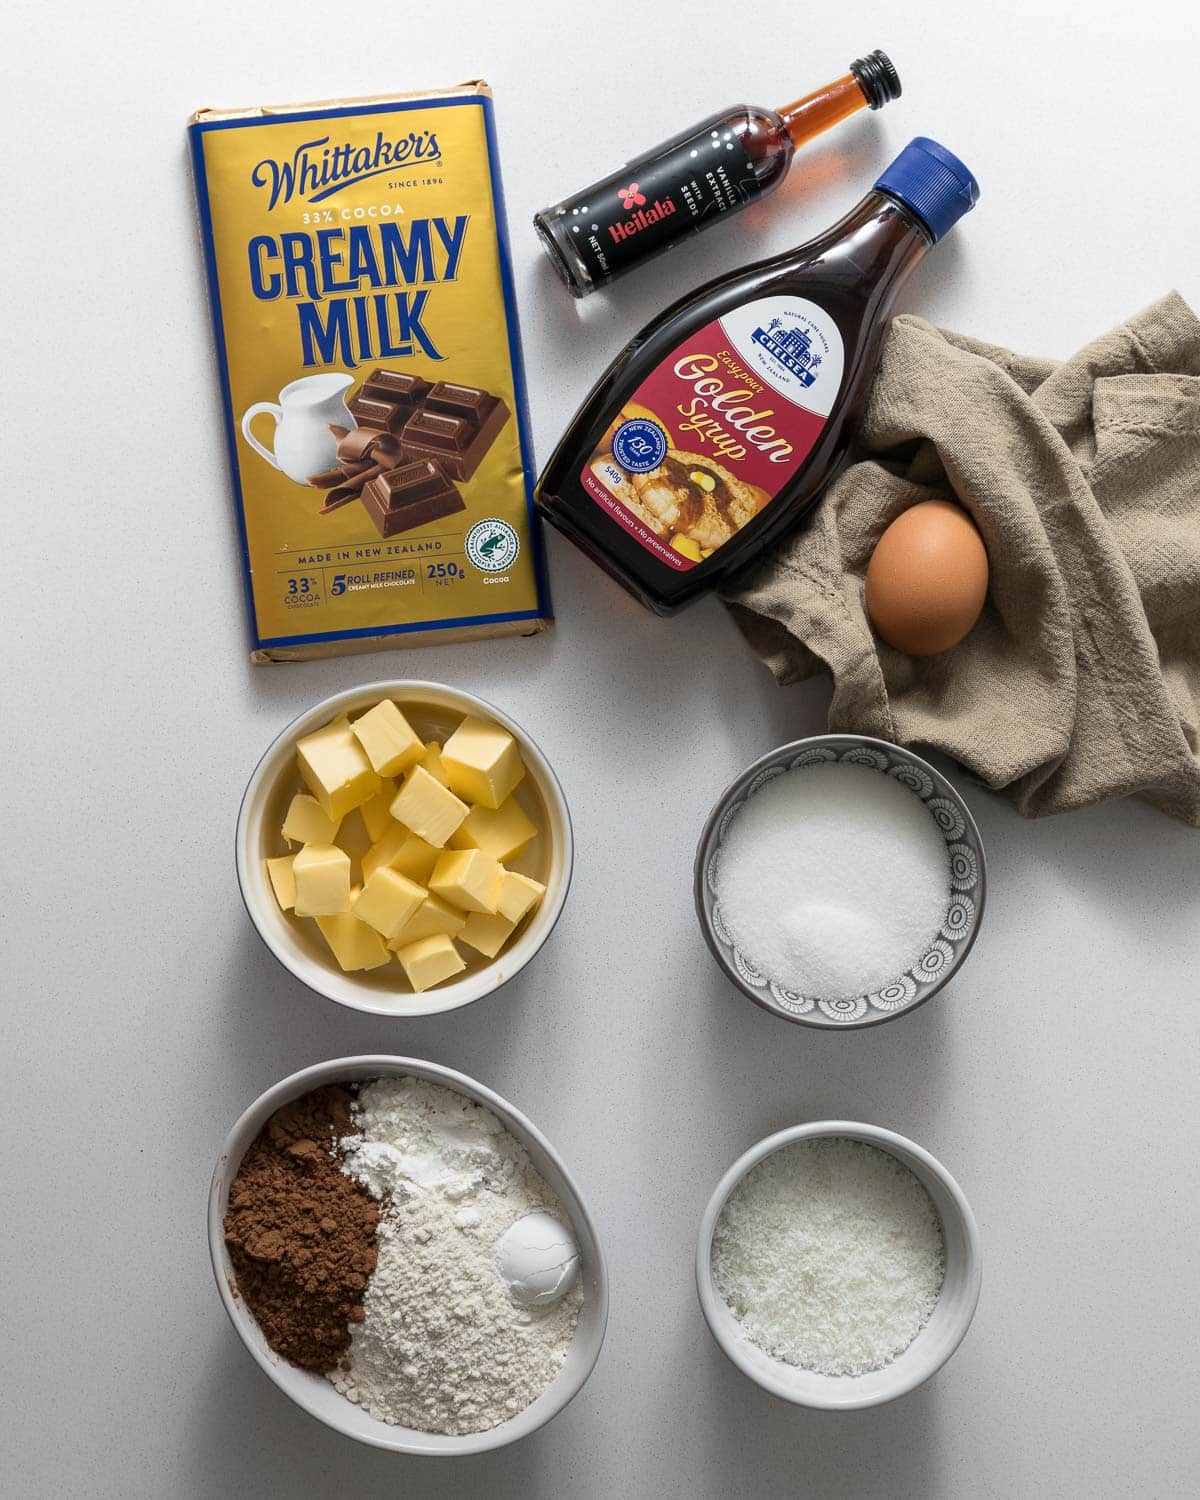
Cookie Dough Ingredients
- All-purpose flour
- Dutch-process cocoa powder
- Baking soda
- Salt
- Unsalted butter
- Granulated sugar
- Brown sugar
- Egg
- Egg yolk
- Vanilla extract
- Semi-sweet chocolate chips or a block of chocolate
Ganache Filling Ingredients
- Milk chocolate bar (good quality)
- Heavy cream
- Unsalted butter
- Salt
Key Ingredient Notes
Dutch-process cocoa powder — This is the star of the cookie. Dutch-process (sometimes labeled "dark cocoa" or "specialty dark") has been treated with an alkalizing agent that neutralizes its natural acidity.
What that means for you practically is a richer, deeper chocolate flavor and a gorgeous dark brown color that makes these cookies look as good as they taste. Regular natural cocoa will still work, but your cookies won't be quite as dark or intensely flavored. Look for brands like Rodelle, Droste, or Hershey's Special Dark at your local grocery store.
Milk chocolate for the ganache — Here's where quality really matters. Skip the chocolate chips for the filling — they contain stabilizers that prevent them from melting into a truly smooth ganache. Instead, reach for a good-quality milk chocolate bar. Look for one with at least 30–35% cacao content. Lindt, Ghirardelli, and Callebaut all work beautifully. The higher the quality, the silkier and more complex your ganache will be.
Unsalted butter (softened, not melted) — Butter temperature is one of those details that makes or breaks cookie texture. Softened butter — meaning it holds its shape but gives when you press a finger into it — creates that perfect chewy-yet-sturdy cookie structure. Melted butter produces flatter, crispier cookies, and cold butter won't cream properly. If you forgot to pull yours out ahead of time, cut it into thin slices and let it sit for about 15 minutes at room temperature.
Brown sugar — Using a combination of granulated and brown sugar gives these cookies the best of both worlds: granulated sugar for spread and a slightly crisp edge, brown sugar for moisture, chew, and a hint of caramel-like depth that pairs beautifully with the chocolate.
Heavy cream — For the ganache, heavy cream (at least 36% fat) is non-negotiable. Lower-fat options like half-and-half won't give you the rich, emulsified texture you need. The fat content is what makes the ganache glossy and smooth rather than grainy or separated.
Ingredient Substitutes
Gluten-free option: Swap the all-purpose flour 1:1 with a good gluten-free baking flour blend (one that contains xanthan gum). The cookies will be slightly more delicate but just as delicious. Chill the dough a little longer — about 90 minutes — to help it hold together better.
Dairy-free ganache: Replace the heavy cream with full-fat coconut cream and use a high-quality dairy-free milk chocolate (like Hu Kitchen or Enjoy Life brand chocolate chips, which melt more cleanly than regular dairy-free chips). The ganache will set firmer, so let it cool a bit longer before piping.
Dark chocolate ganache: If you prefer a more bittersweet, grown-up filling, swap the milk chocolate for a 60–70% dark chocolate bar. Reduce the heavy cream slightly to about 6 tablespoons to keep the ganache thick enough to hold in a sandwich. The result is more intense and a little less sweet — incredible.
Coconut sugar: You can replace the granulated sugar with coconut sugar for a slightly earthier, less refined sweetness. The cookies will be a touch darker and have a subtle caramel note that works wonderfully with chocolate.
How to Make Double Chocolate Sandwich Cookies
Step 1: Mix and Chill the Dough
Start by whisking your dry ingredients — the flour, cocoa powder, baking soda, and salt — together in a medium bowl and setting them aside. In a large bowl, beat the softened butter with both sugars using a hand or stand mixer on medium speed for about 3 minutes, until the mixture is noticeably lighter in color and fluffy. This step isn't just about combining ingredients — it's incorporating air, which gives the cookies their structure and slight lift.
Add the egg, extra yolk, and vanilla, mixing until fully incorporated and creamy. The extra yolk adds richness and helps the cookies stay chewy rather than cakey. With the mixer on low, add the dry ingredients about halfway at a time, mixing just until no streaks of flour remain. Fold in the chocolate chips by hand. The dough will be thick — that's exactly right.
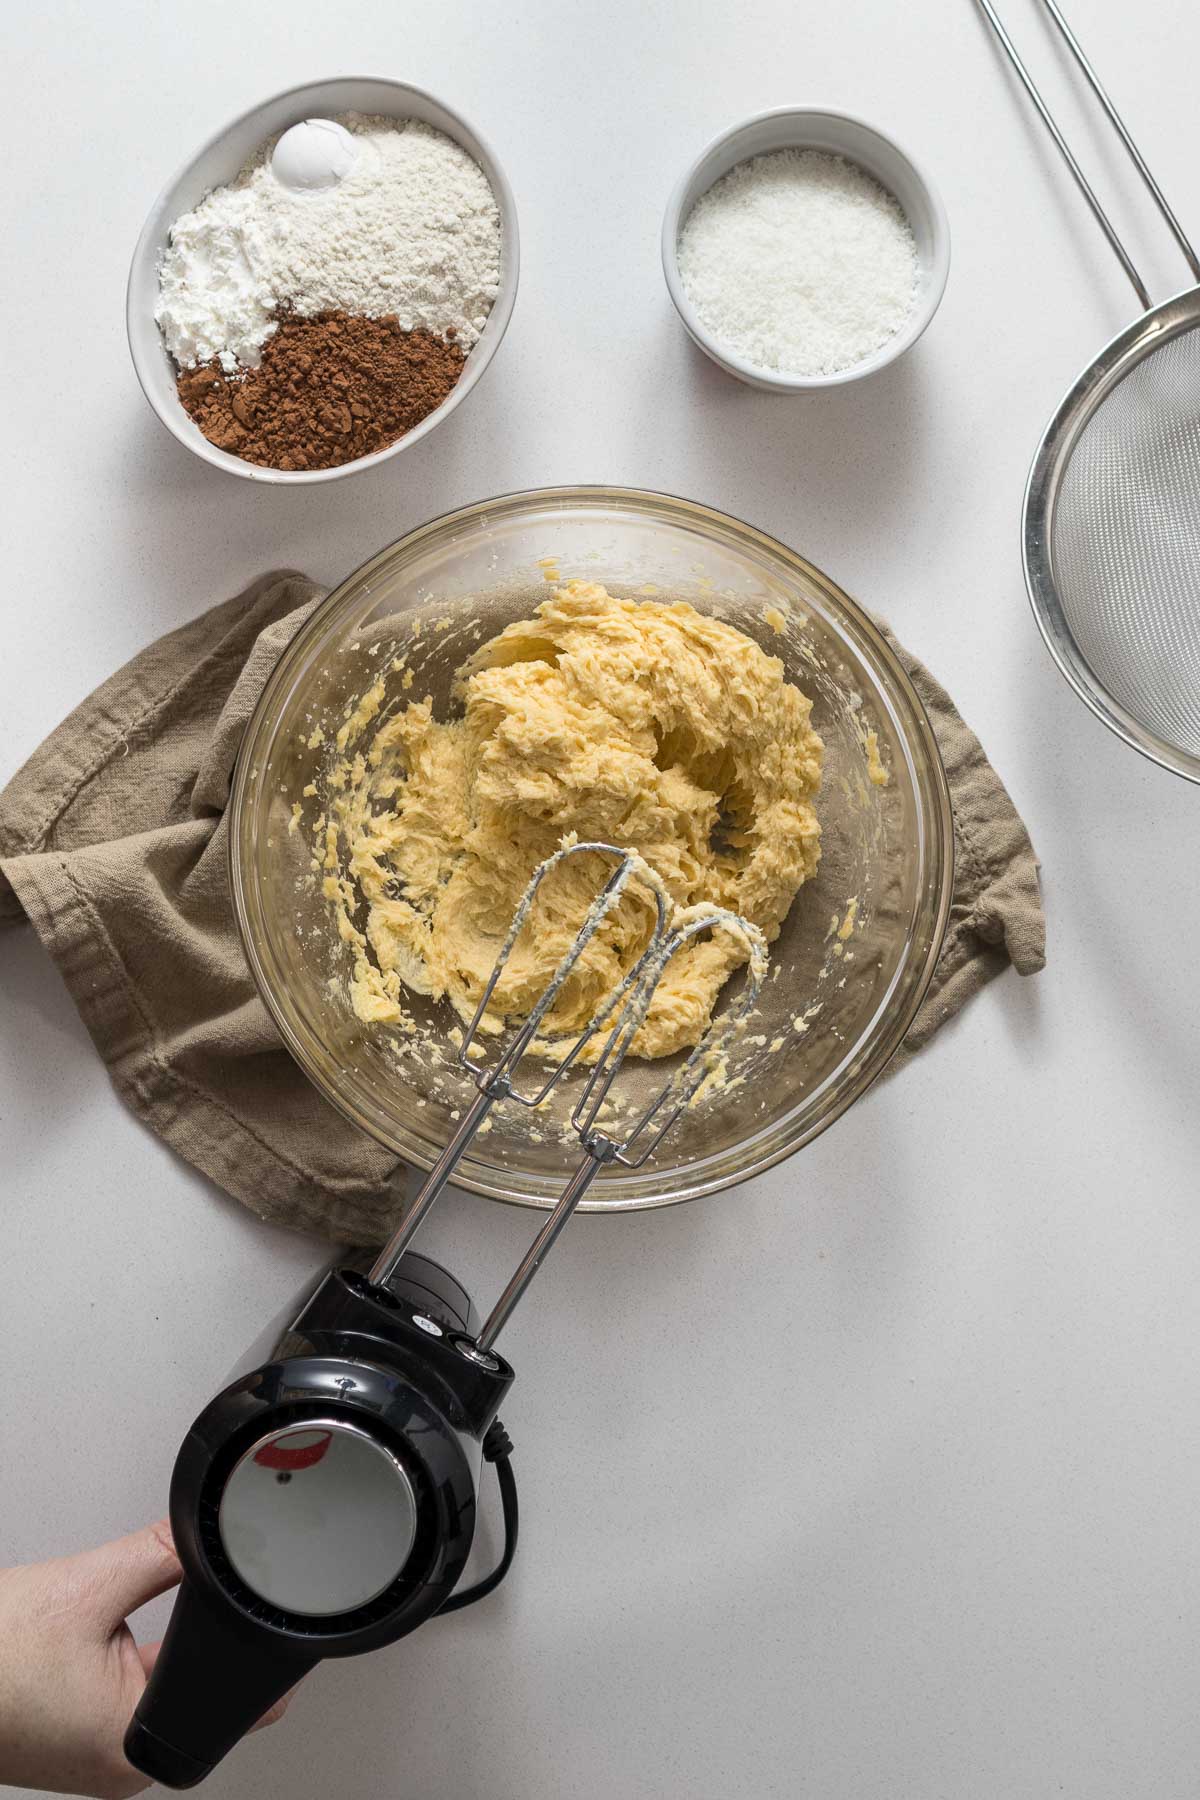
Wrap the dough tightly in plastic wrap, flatten it into a disc, and refrigerate for at least one hour. Don't skip this step. Chilling firms up the butter, which prevents the cookies from spreading too thin in the oven and ensures they stay plump and chewy once baked.
Step 2: Bake the Cookies
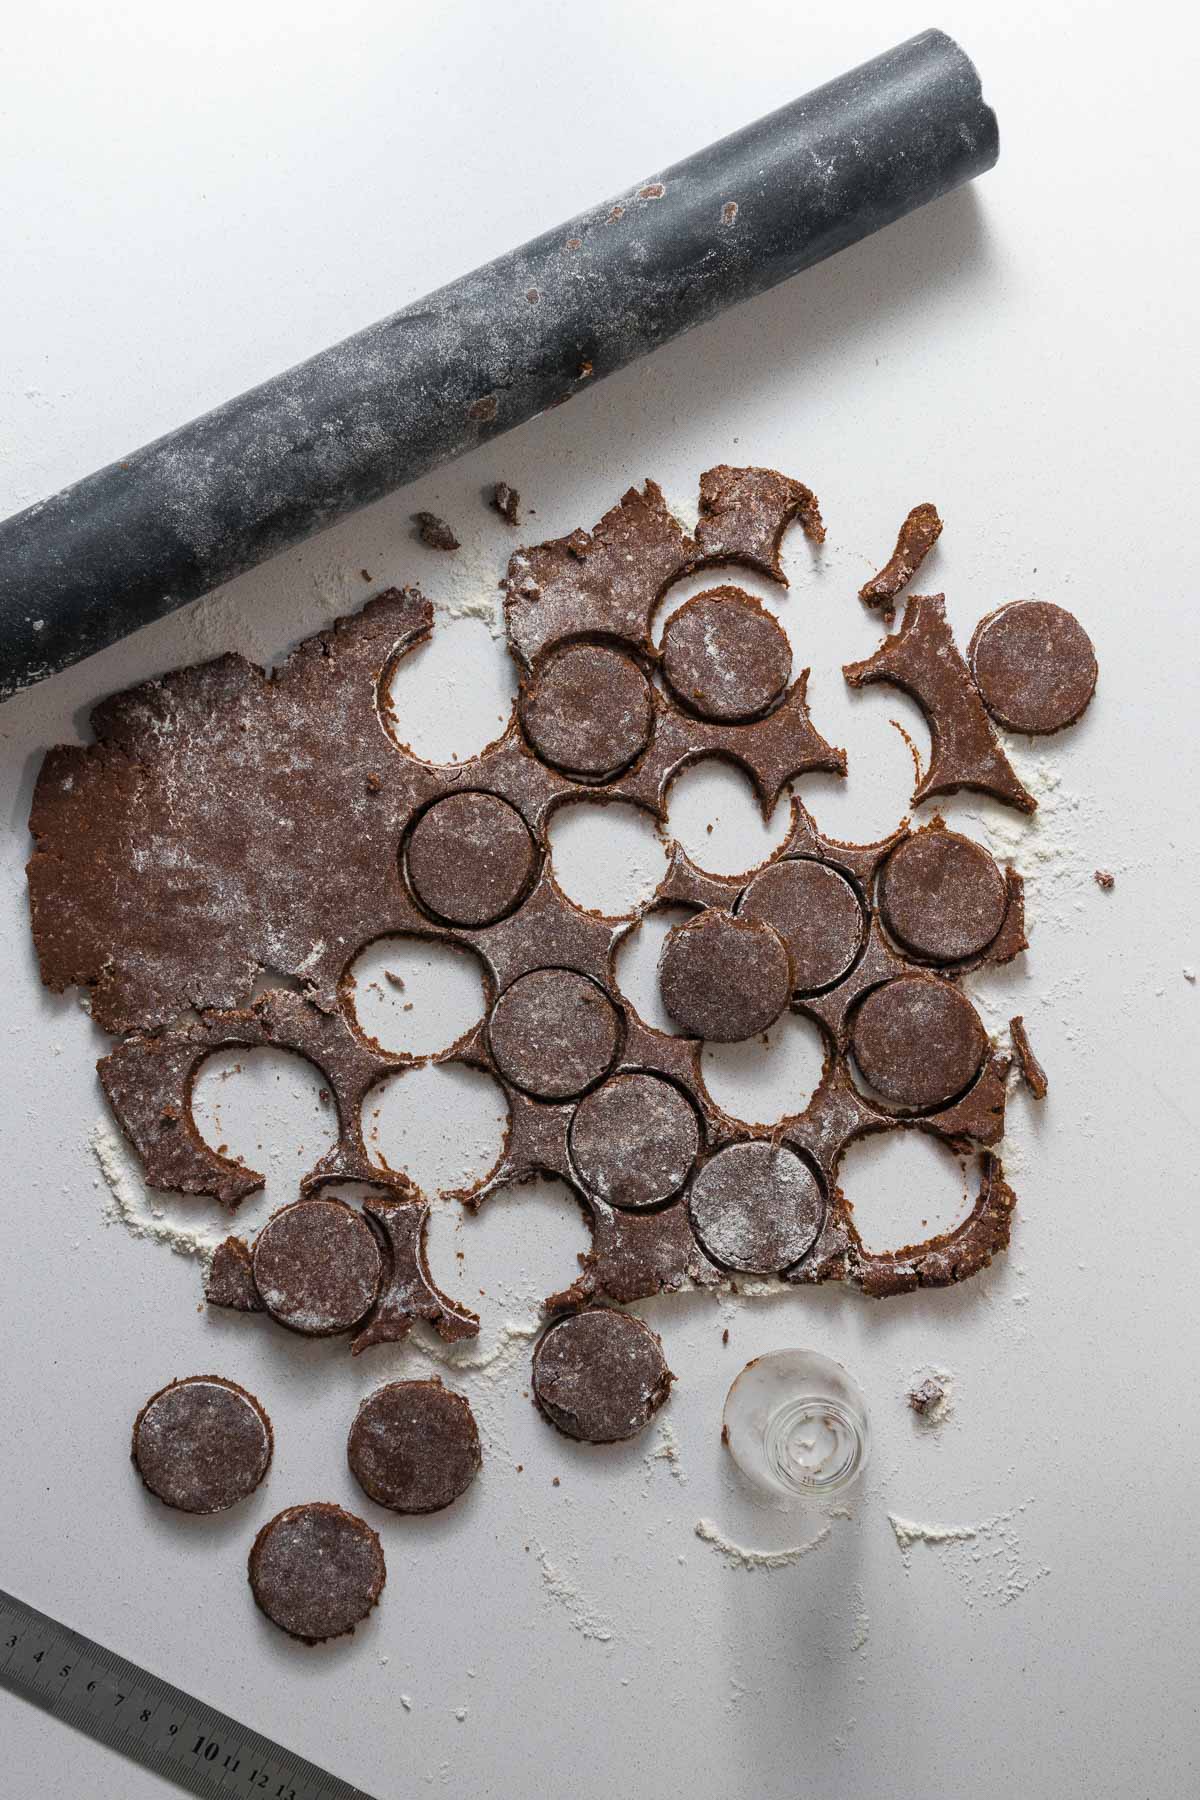
Preheat your oven to 350°F and line your baking sheets with parchment paper. Using a cookie scoop or a tablespoon measure, portion out the dough into balls about 1 inch in diameter. Place them 2 inches apart on the prepared sheets — they spread just a little — and use the flat bottom of a glass to gently press each ball into a slightly flattened disc. You want them to be uniform in thickness so they pair up evenly later.
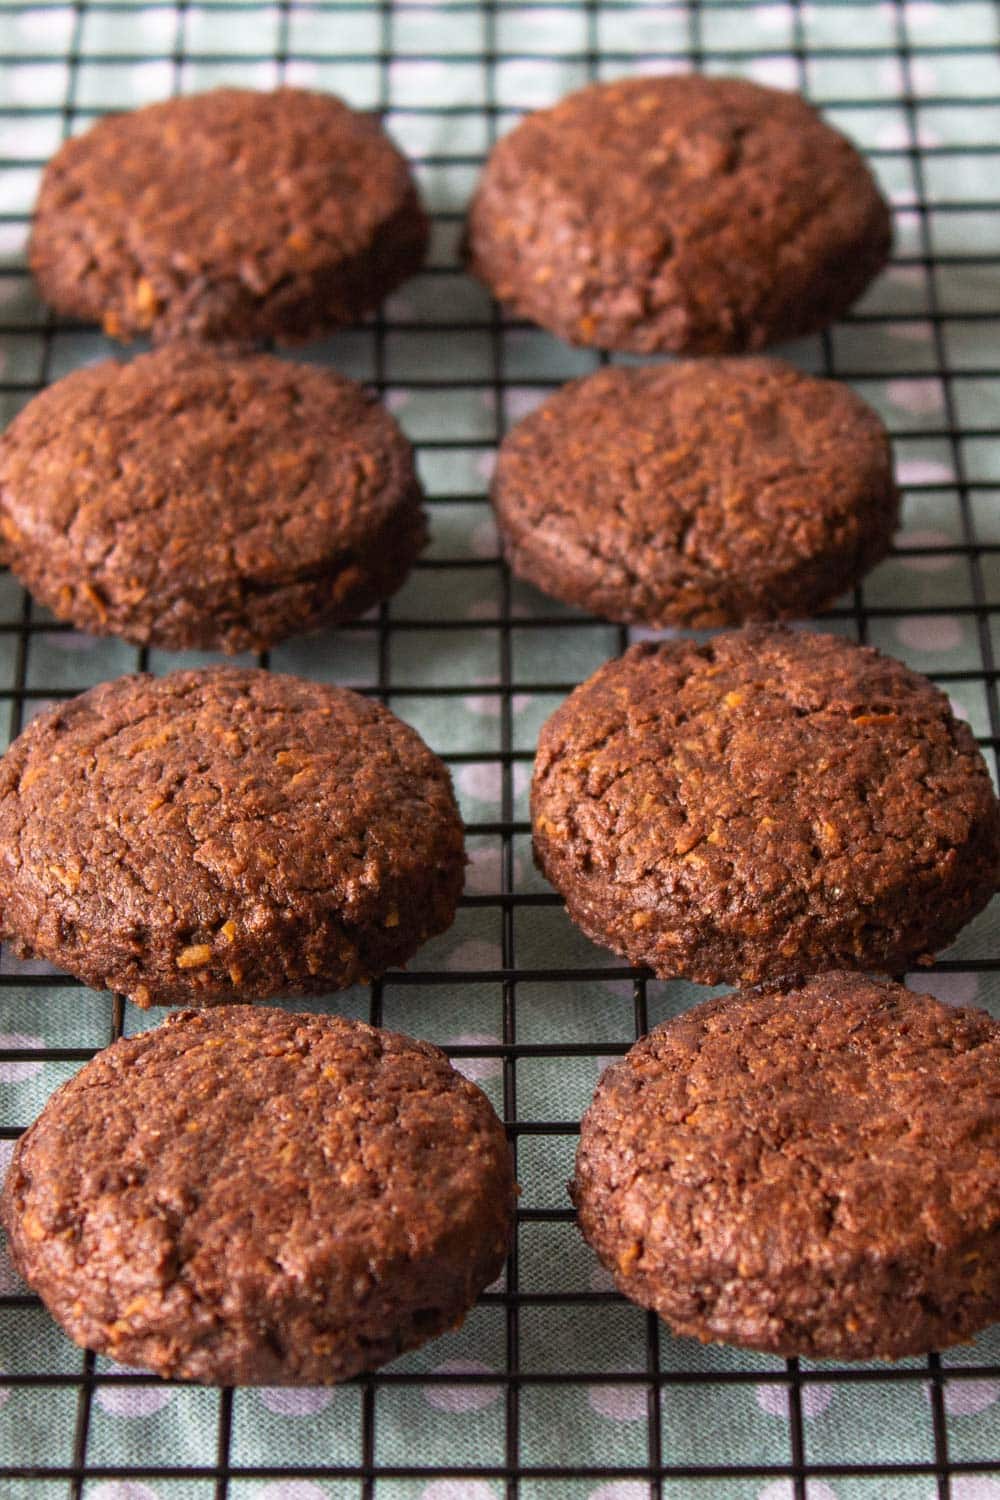
Bake for 9–11 minutes. The edges should look set and just barely matte, but the centers can look slightly underdone — they'll firm up as they cool and you want them fudgy, not crispy. Let the cookies rest on the baking sheet for 5 minutes before moving them to a wire rack. They're fragile when they're hot, so give them that time. Let them cool completely before filling — this is important, because warm cookies will melt the ganache right off.
Step 3: Make the Milk Chocolate Ganache
Finely chop your milk chocolate and place it in a heatproof bowl — the finer the chop, the faster and more evenly it melts. In a small saucepan, heat the heavy cream over medium-low heat until you see small bubbles forming around the edges and wisps of steam rising. You want it just at a simmer, not a rolling boil.
Pour the hot cream over the chopped chocolate and let it sit undisturbed for about a minute to soften the chocolate before you start stirring. Then, using a spatula, stir gently in slow circular motions from the center outward until the mixture is completely smooth and glossy. Add the softened butter and pinch of salt and stir until incorporated — the butter adds gloss and a subtle richness to the ganache.
Let the ganache cool at room temperature for 25–30 minutes, stirring occasionally, until it has thickened to a consistency that holds its shape when you lift the spoon but is still soft enough to spread or pipe. If your kitchen is warm, pop it in the refrigerator for 10–15 minutes instead.
Step 4: Assemble the Sandwich Cookies
Before you start assembling, sort your cookies into pairs by matching similar sizes — this makes for tidier, more uniform sandwiches. Flip half of the cookies so their flat bottoms face up.
Transfer the ganache to a piping bag fitted with a round tip, or simply use a small spoon. Pipe or spoon about 1½ teaspoons of ganache onto the center of each upturned cookie. You don't need to spread it all the way to the edges — when you press the top cookie on, the ganache will naturally spread outward. Place the matching cookie on top, flat side down, and press gently and evenly until the filling just peeks out at the edges. Repeat with the remaining pairs.
Let the assembled cookies sit for about 15 minutes so the ganache can set slightly before serving. This makes them much easier to handle and gives you that satisfying, clean bite.
Weighing & Measuring Ingredients
Baking is a science, and these cookies are a great example of why precision matters. A cup of flour can vary by as much as 30% depending on how you scoop it — pack it in too tightly and your cookies will turn out dry and crumbly rather than fudgy and chewy. The most reliable approach is to use a kitchen scale and measure your ingredients by weight. For this recipe, 1¾ cups of all-purpose flour works out to about 220 grams, and ½ cup of Dutch-process cocoa is roughly 50 grams.
If you don't have a scale, the spoon-and-level method is your next best option. Use a spoon to lightly scoop flour into your measuring cup until it's heaped above the rim, then sweep a straight edge across the top to level it off. Never scoop directly from the bag — that compacts the flour and throws off the whole recipe. For the cocoa powder, the same rule applies, and for the sugars, pack the brown sugar firmly into the cup but leave the granulated sugar loose. Taking a few extra seconds at this stage pays off in a noticeably better cookie.
Pro Tips for this Recipe
Don't rush the chill. An hour in the fridge is the minimum, but if you can let the dough chill overnight, do it. The extra time deepens the chocolate flavor and gives you a thicker, chewier cookie with better structure. Cold dough also spreads less in the oven, which means those flat-bottomed discs stay uniform — exactly what you want for sandwich assembly.
Use a cookie scoop. This is the single best thing you can do for even sandwiching. When every cookie is the same size and shape, the pairs match up perfectly and the ganache distributes evenly. A #40 scoop (about 1½ tablespoons) is ideal for this recipe.
Chop the chocolate fine. For the ganache, resist the urge to use rough chunks. The finer you chop the chocolate, the faster and more evenly it melts when the hot cream hits it, giving you a silkier result with less stirring.
Test your ganache consistency before piping. Before you start assembling, do a quick test — drop a small spoonful onto a plate. It should hold its mound shape for a second or two before slowly settling. If it's too runny, give it another 5 minutes to cool. If it's seized up and too stiff to pipe, warm it very gently over a double boiler for 30 seconds, stirring constantly.
Let the ganache set before stacking. After assembling, resist the urge to pile the cookies into a container right away. Give them 15 minutes on the counter to let the ganache firm up slightly — this prevents the filling from squeezing out the sides when the cookies are stacked.
Underbake slightly. These cookies will look underdone when you pull them from the oven, and that's exactly right. They firm up considerably as they cool, and that slight underbake is what keeps them fudgy rather than dry. If the edges look set and the centers still look glossy, you're in the sweet spot.
How To Store Leftovers and Reheat
Once assembled, store the cookies in a single layer (or with parchment between layers) in an airtight container at room temperature for up to 2 days. Because of the dairy in the ganache, for longer storage transfer them to the refrigerator, where they'll keep well for up to 5 days.
Pull them out 20–30 minutes before serving and let them come to room temperature — the ganache softens beautifully and the cookie texture comes back to life. For freezing, freeze the baked and cooled cookie shells (unfilled) in an airtight bag for up to 2 months, then thaw at room temperature and fill with freshly made ganache.
📌 Did you try this recipe?
Have you made this delicious recipe and loved it?
I would love it if you took a minute to leave a star rating and review. It is also helpful if you made any substitutions or changes to the recipe to share that; thank you!
📌 Please also pin the image below, then you can find the recipe for the next time you want to cook.
Recipe Card
Double Chocolate Sandwich Cookie
Ingredients
For the Chocolate Cookies
- 1 ¾ cups all-purpose flour
- ½ cup Dutch-process cocoa powder
- 1 teaspoon baking soda
- ½ teaspoon salt
- 1 cup 2 sticks unsalted butter, softened
- ¾ cup granulated sugar
- ½ cup packed brown sugar
- 1 large egg
- 1 egg yolk
- 2 teaspoon vanilla extract
- ½ cup semi-sweet chocolate chips
For the Milk Chocolate Ganache Filling
- 8 oz good-quality milk chocolate finely chopped
- ½ cup heavy cream
- 1 tablespoon unsalted butter softened
- Pinch of salt
Instructions
- Make the dough. Whisk together flour, cocoa powder, baking soda, and salt in a medium bowl. In a large bowl, beat softened butter and both sugars until light and fluffy, about 3 minutes. Add the egg, egg yolk, and vanilla, mixing well. Gradually fold in the dry ingredients until just combined, then stir in the chocolate chips.
- Chill the dough. Wrap the dough tightly in plastic wrap and refrigerate for at least 1 hour (up to 48 hours).
- Preheat oven to 350°F. Line two baking sheets with parchment paper.
- Scoop and bake. Roll dough into 1-inch balls and place 2 inches apart on prepared baking sheets. Gently flatten each ball slightly with the bottom of a glass. Bake for 9–11 minutes until set at the edges but still soft in the center. Cool on the baking sheet for 5 minutes, then transfer to a wire rack to cool completely.
- Make the ganache. Place finely chopped milk chocolate in a heatproof bowl. Heat heavy cream in a small saucepan over medium-low heat until just simmering. Pour over the chocolate and let sit for 1 minute. Stir gently until smooth, then add the butter and a pinch of salt. Let cool at room temperature for 25–30 minutes until thick and spreadable.
- Assemble the cookies. Match cookies into pairs of similar size. Pipe or spoon about 1½ teaspoon of ganache onto the flat side of one cookie. Press its partner on top, flat side down, and squeeze gently until the filling just reaches the edges.
- Set and serve. Allow assembled cookies to sit for 15 minutes to let the ganache firm up before serving.
Nutrition information is an estimate. If scaling the recipe remember to scale your cook and bakeware accordingly. All temperatures stated are conventional, unless otherwise stated. Recipes tested in grams and at sea level.
Comments
No Comments