


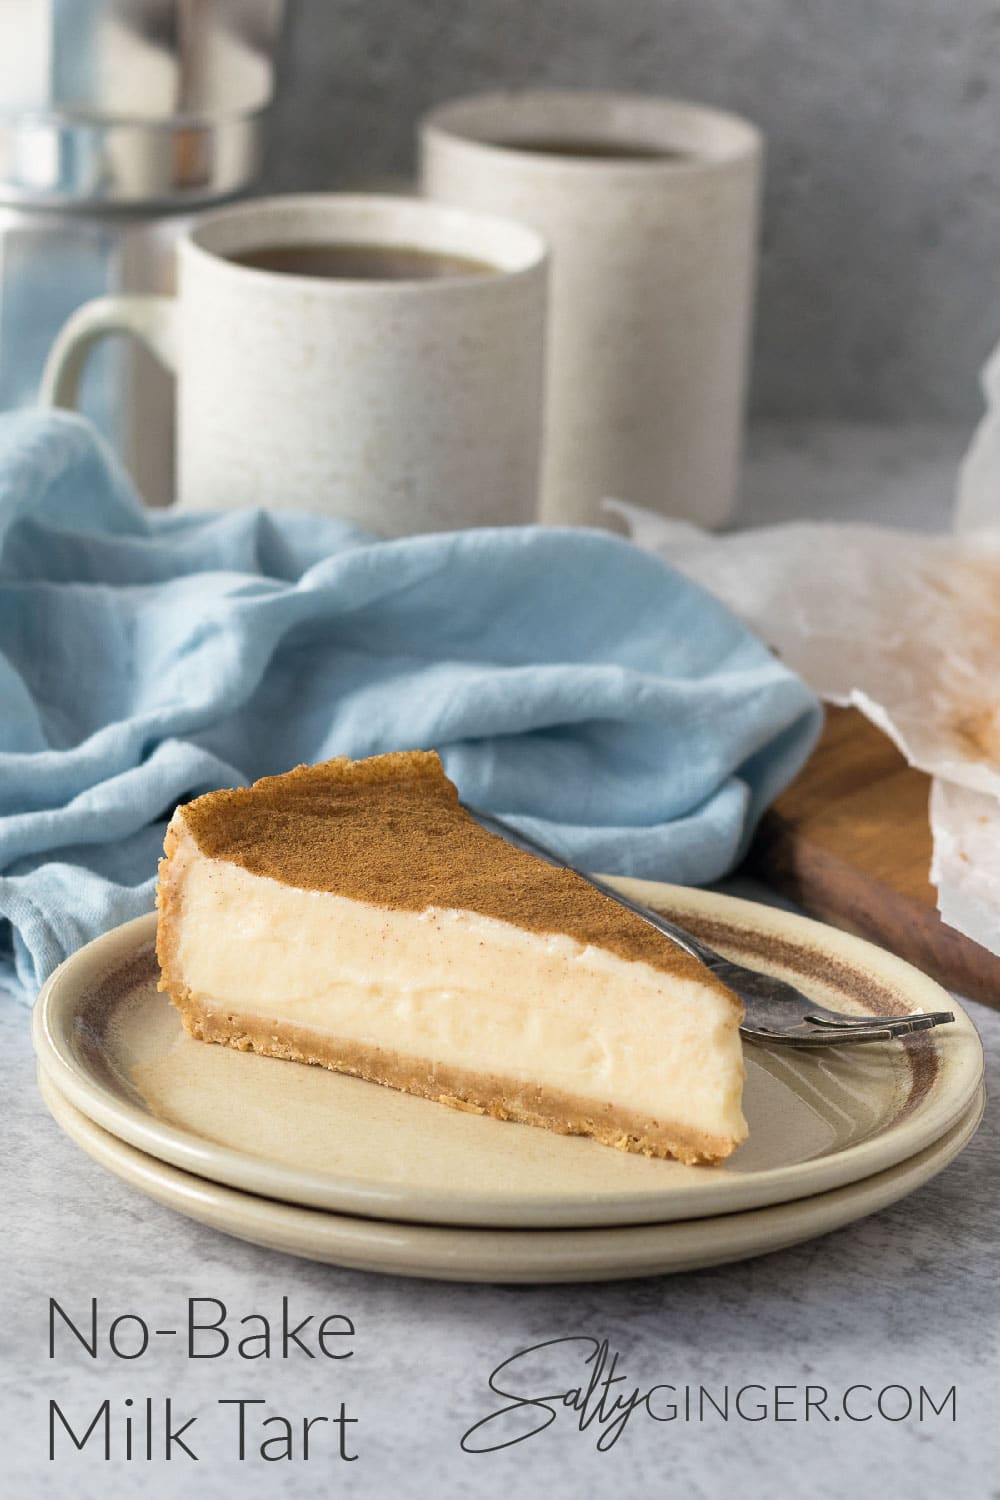
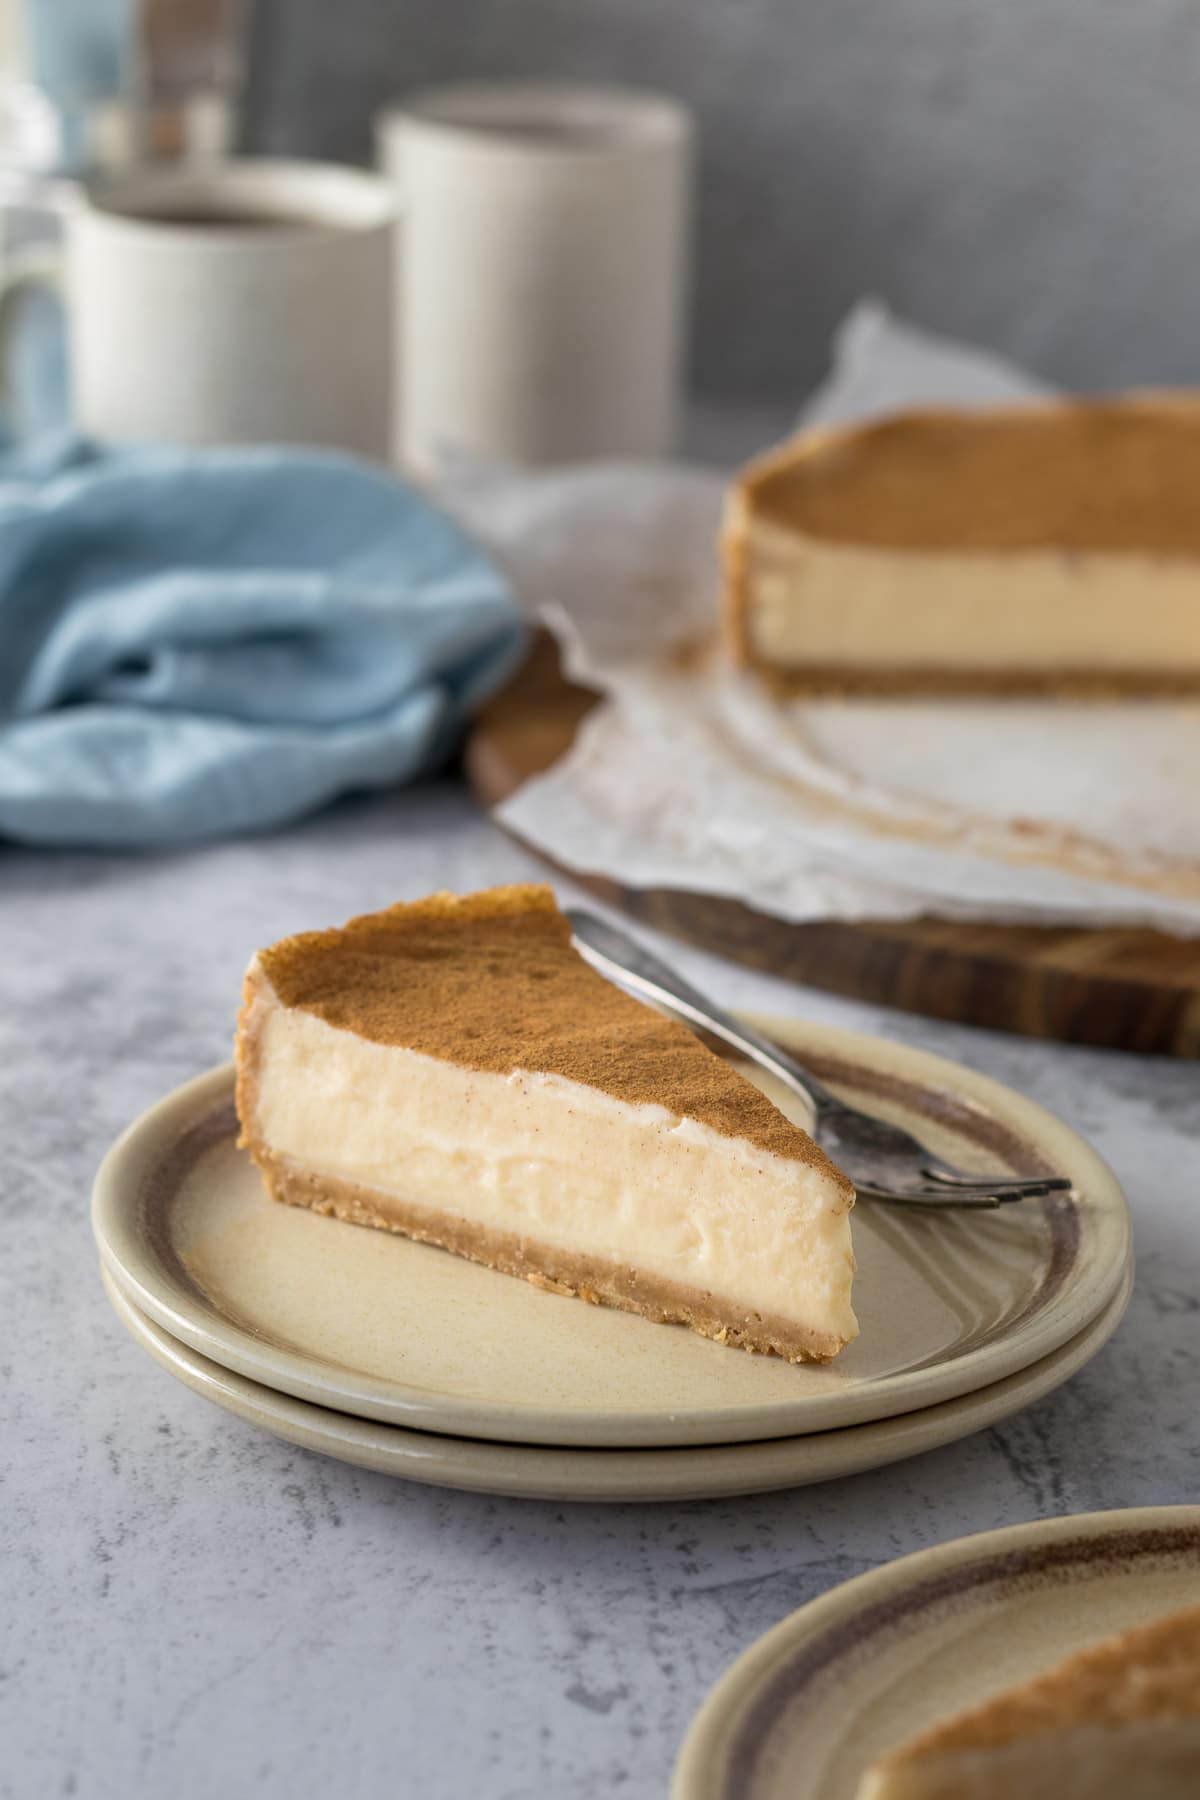
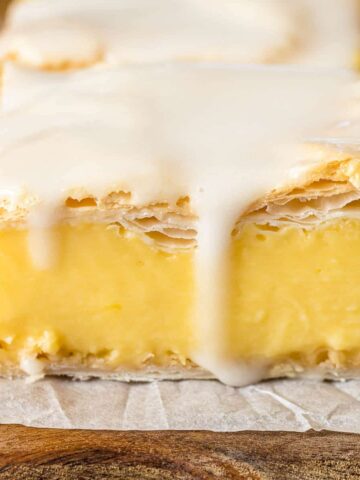
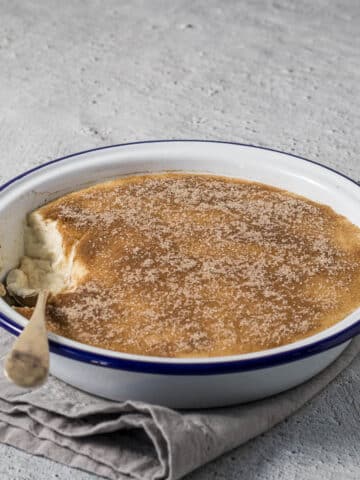
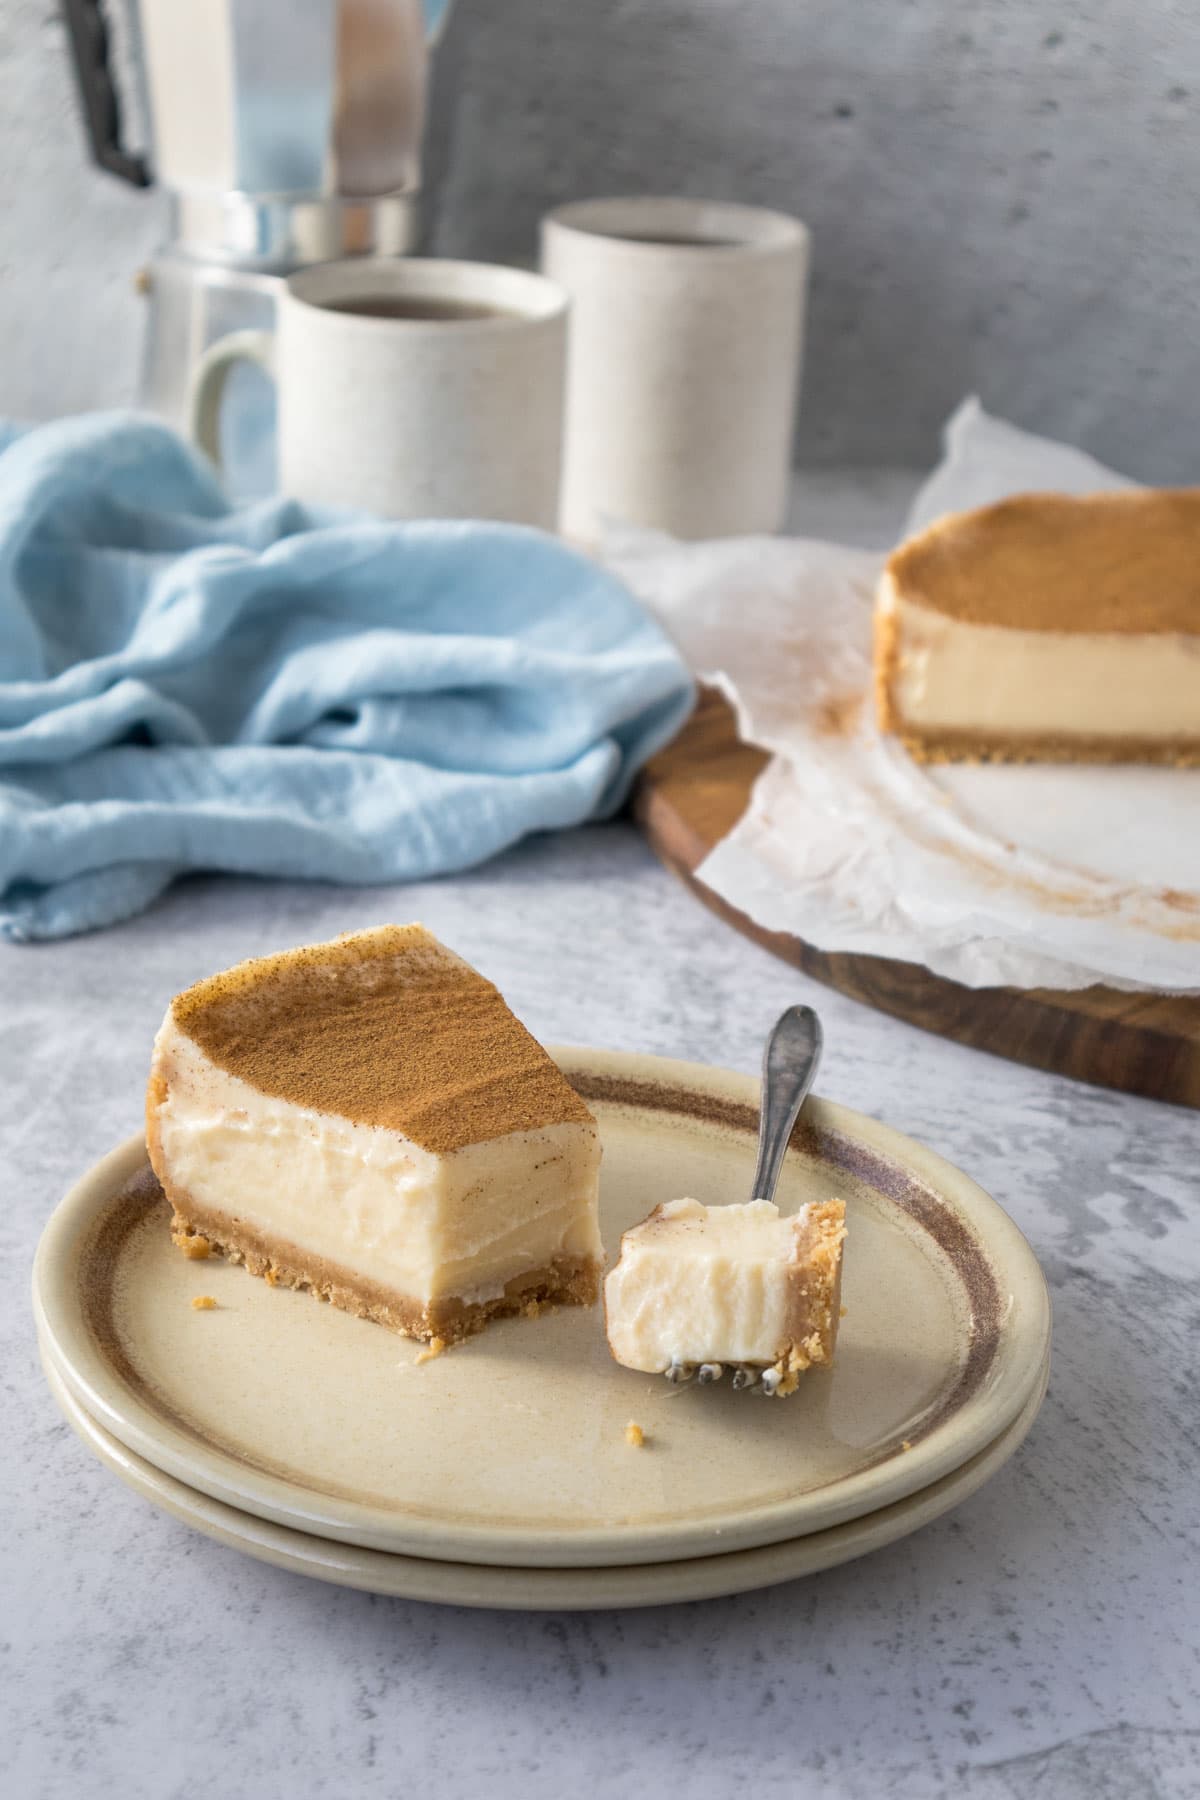
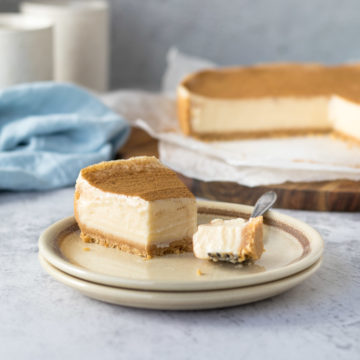
This easy, silky, smooth, homemade no-bake milk tart sits on a Tennis biscuit base and is sweetened with condensed milk, topped with cinnamon. A South African comfort dessert that you have to try yourself. Its perfect for afternoon tea or for a dinner party.
Jump to:
- What is a Milk Tart?
- My Traditional Milk Tart vs My No-Bake Milk Tart
- Crustless Milk Tarts Two Ways
- Milk Tart Shooters, Milk Tart Liqueur, or Melktertjies
- Ingredients
- How to Make a No-Bake Milk Tart
- Pro Tips for this Recipe
- Original Recipe
- More South African African Recipes
- Storage and Freezing
- No Bake Milk Tart FAQ
- Rate & Review!
- Recipe Card
- Community Comments
What is a Milk Tart?
Milk tarts or melktert (in Afrikaans) is a dessert that either has a sweet pastry crust or biscuit base, and a milk-flavoured custard filling that is topped with ground cinnamon. I would firmly place milk tart into the South African comfort food category.
The South African milk tart has its origins in the 17th-century Dutch Cape Colony (Cape of Good Hope, South Africa). It has most likely been developed from the Dutch mattentaart.
My Traditional Milk Tart vs My No-Bake Milk Tart
My Traditional Milk Tart begins with a sweetened biscuit crust that is then filled with a partially cooked milk filling (or custard) that is then baked until the custard milk filling is almost set.
This condensed milk tart filling is cooked on the stove and poured either into a tennis biscuit base (similar to a cheesecake biscuit base), or straight over whole tennis biscuits lining a dish. This tart is only sweetened with condensed milk.
Both of these melkterts are equally delicious. Yet, with a variation in flavour due to the sweeteners and cooking methods used.
Crustless Milk Tarts Two Ways
Option 1 - Once the no-bake filling has been cooked, spoon it into a glass dish, cover it with cling film and allow it to cool until just warm to the touch before placing it in the fridge to cool and set completely for at least 4 hours or overnight.
Option 2 - Head over to my Traditional Milk Tart Recipe. Cook the filling as per instructions, and then place the filling into a glass dish without the biscuit base. Bake as per instructions.
Milk Tart Shooters, Milk Tart Liqueur, or Melktertjies
For a boozier, quick and easy addition to any celebration try out my Milk Tart Shooter Recipe.
Ingredients
Here are some notes on the ingredients used in this recipe. Please see the recipe card for quantities.
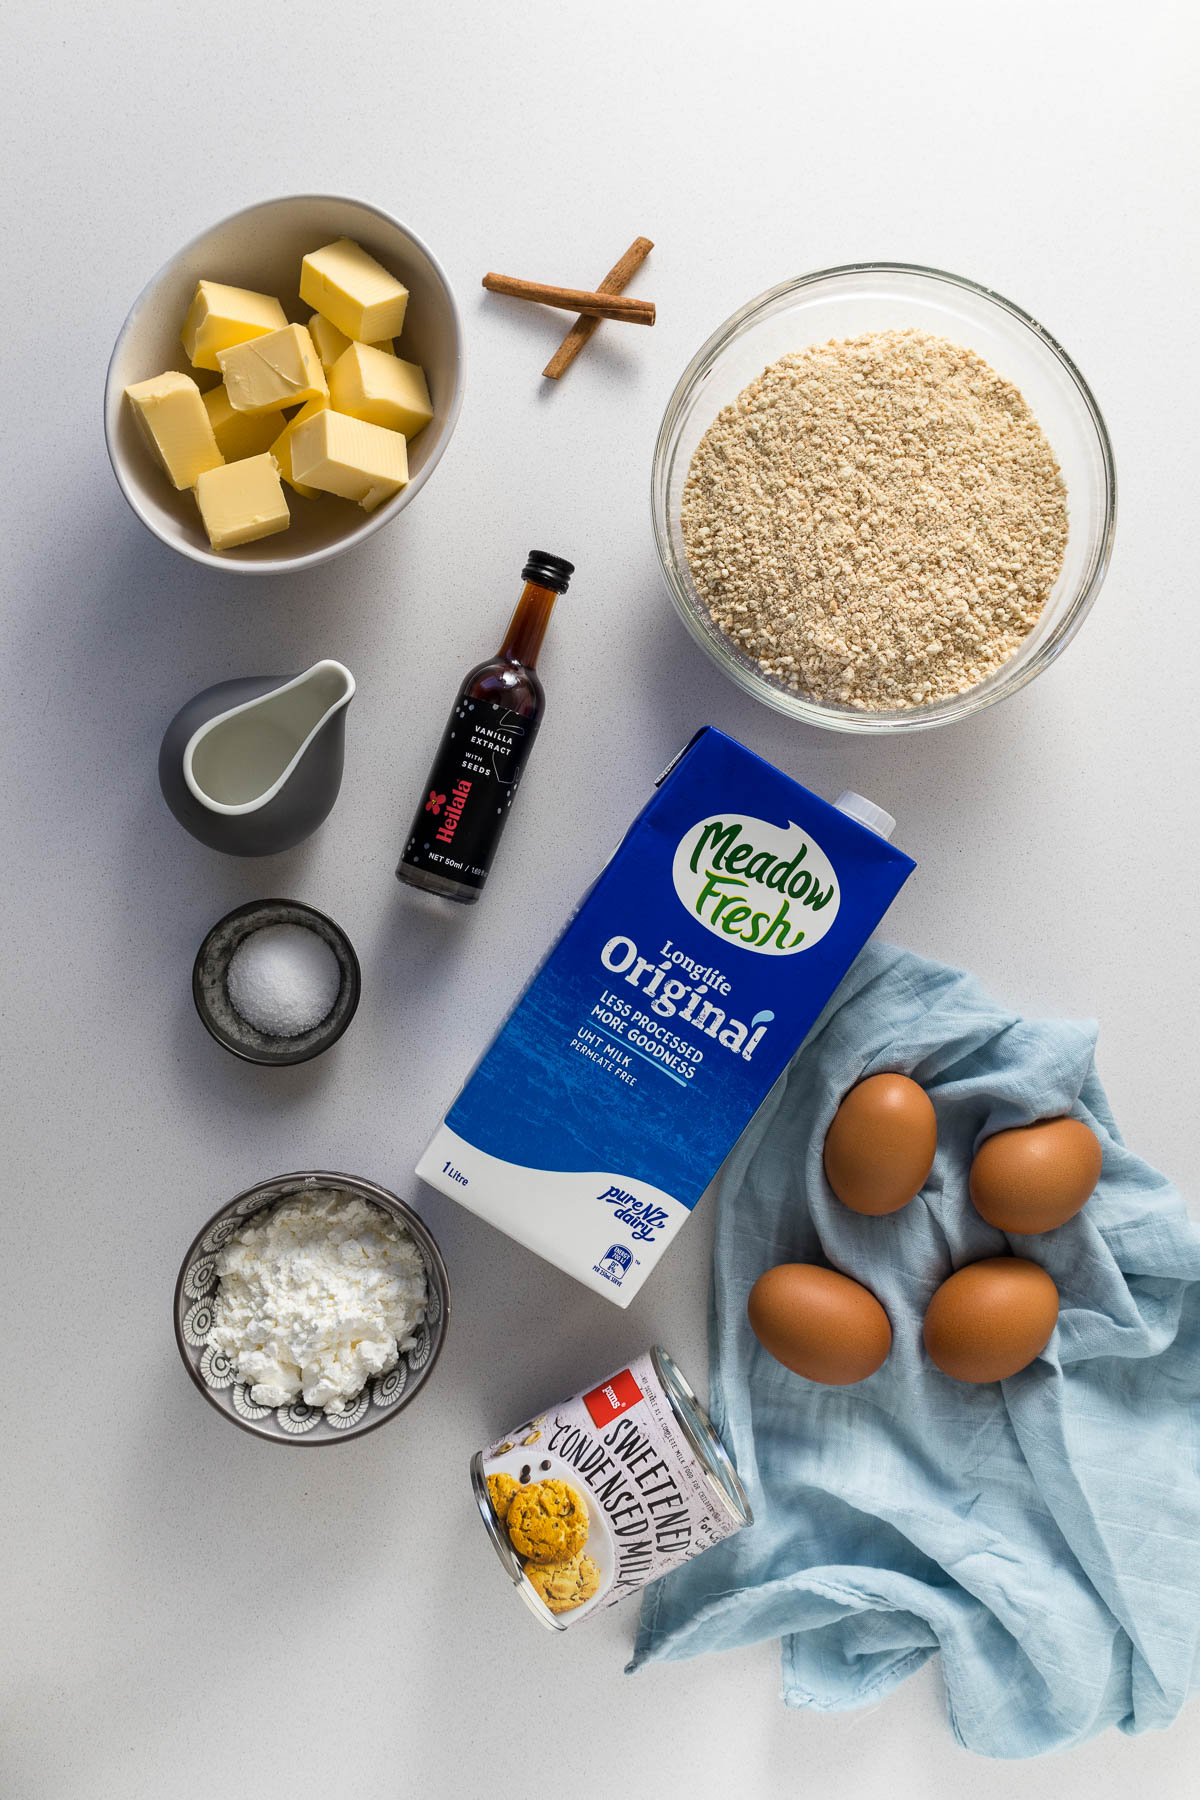
Biscuit Base Ingredients
Tennis Biscuits not only make a perfect biscuit base but also invoke a nostalgic coconut biscuit flavour that all South Africans know and love. Tennis biscuits are coconut-flavoured tea biscuits. An alternative to Tennis biscuits would be a sort of plain Vanilla biscuit such as Marie Biscuits, here in New Zealand and Australia I would recommend using Krispie or Wine biscuits.
Butter - I used New Zealand butter in my recipes, which has approximately 82% butterfat and can be very yellow. Using a biscuit other than Tennis biscuits may require slightly less or slightly more butter to keep the biscuit base together.
Milk Tart Filling Ingredients
Milk - Whole or Full Fat Milk only! I haven't tested this recipe using lower-fat alternatives.
Condensed Milk - this adds a secondary milk flavour as well as sweetness for this tart. If you don't want to use condensed milk and prefer plain sugar instead, replace the condensed milk with 130g (⅔ cup) plain white sugar, and increase the milk content to 850mL. This CANNOT be substituted with evaporated milk.
Cornstarch - also known as Maizena in South Africa and Cornflour in the UK, Australia and New Zealand. Keep in mind I am referring to the finely ground white cornstarch/cornflour.
Cinnamon Sticks add a slight cinnamon flavour to the milk filling.
Vanilla adds a nice vanilla flavour to the milk filling.
Salt - I use table salt. One teaspoon of table salt equals 1.5 teaspoons of Morton Kosher Salt equals 2 teaspoons of Diamond Crystal.
Eggs - I use large or number 7 eggs for this recipe. And find that 4 eggs is the perfect amount of eggs.
A note on eggs in milk tarts - many of the older recipes I have read and made in the past calls for the separation of the eggs. And then add the egg yolks and whipped egg whites separately to the milk filling. However, honestly, especially for this recipe, I would not bother going the extra mile.
Weighing & Measuring Ingredients
Weighing ingredients with a kitchen scale is more accurate than using measuring cups. All my recipes are developed and tested using grams only.
However, I have activated the metric-to-cup conversions. Simply click on "cups" or "metric" for your preferred measurements. For these conversions, cups are equal to 240 millilitres/8 fluid ounces, tablespoons are 15 milliliters and teaspoons are 5mL.
How to Make a No-Bake Milk Tart
Step 1 - Make the Biscuit Base
Option 1 - Line a glass dish (that can hold about 1.2-1.5L) with tennis biscuits and set it aside.
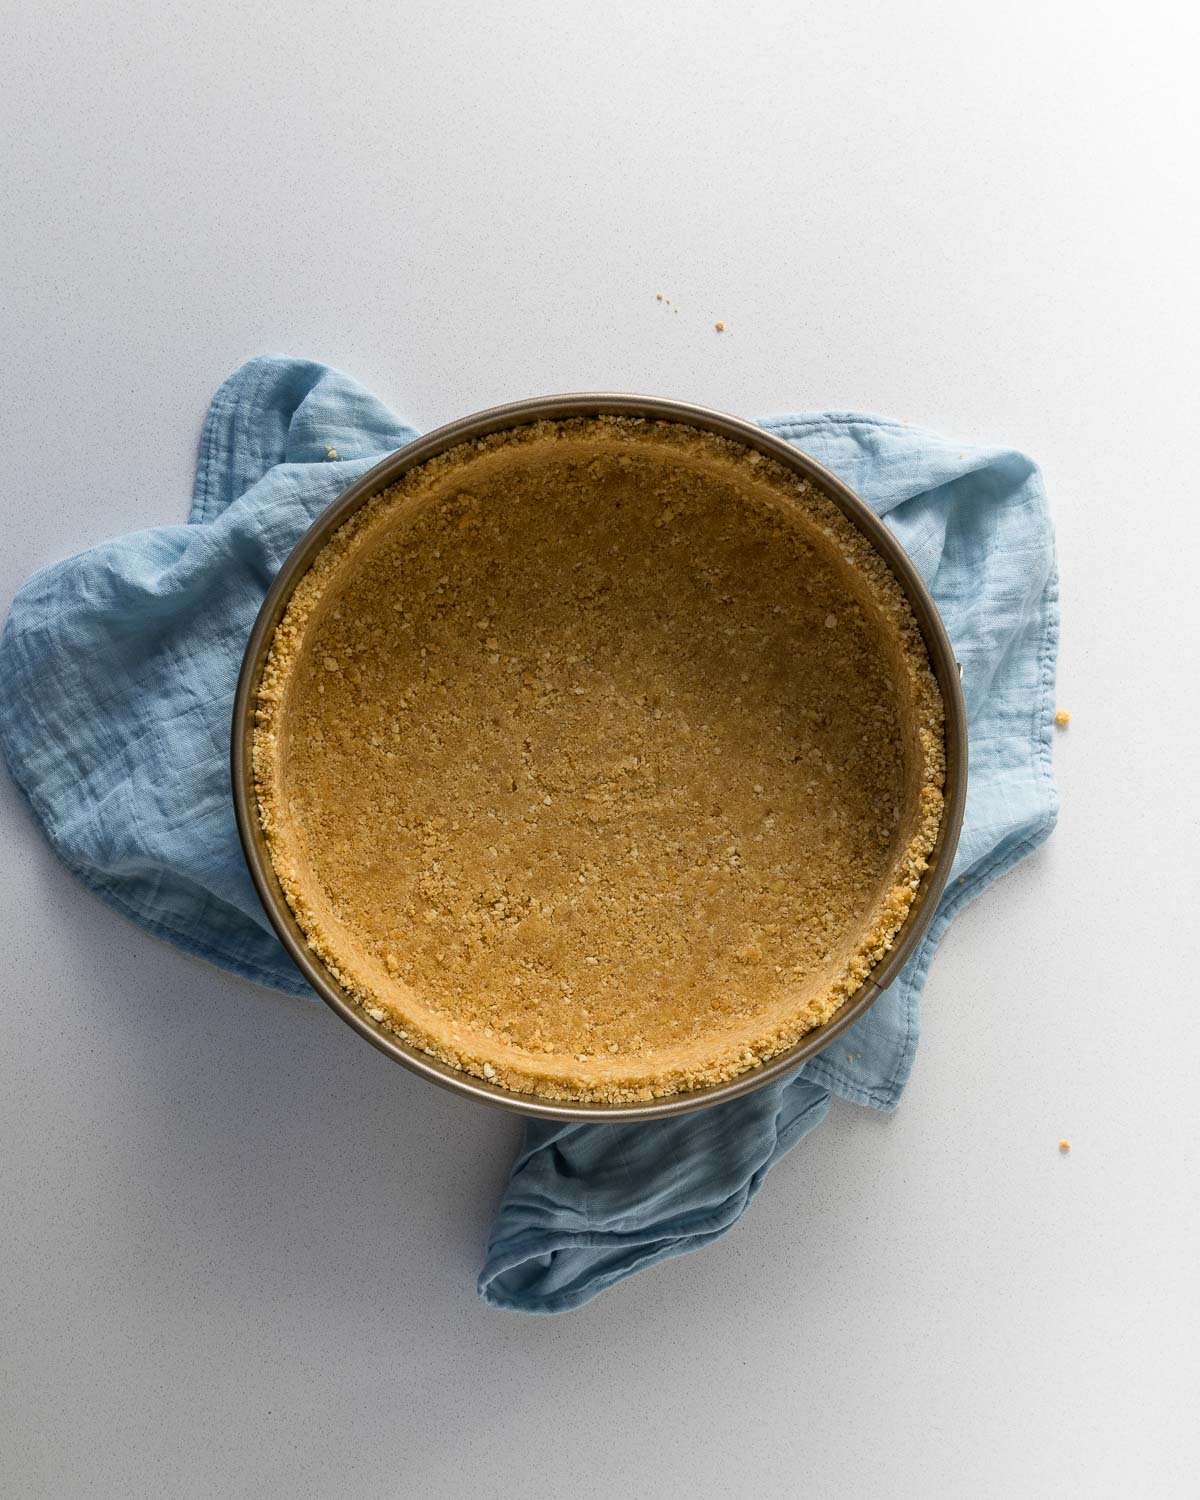
Option 2 - Crushed biscuit base with butter.
Take a piece of square baking paper about 2 inches or 5cm larger than a 23cm springform tin. Crinkle the paper into a ball and then place it over the base of the tin. Press the paper into the corners of the bottom of the base (you may need an extra pair of hands here), before clipping on the sides of the tin.
Finely processor crushes the tennis biscuits until about 80% of the biscuits have a sandy texture. Then mix in the melted butter. Pour the mixture into the tin and press down tightly into the bottom, and up the sides (about 3cm or just over an inch). The sides don't need to be thicker than about 2-3mm. Place in the fridge for an hour.
NOTE - Finely processing the biscuits is a must for a really stable biscuit base.
Step 2 - Whisk together the eggs, water and cornstarch
Whisk together eggs and water until well combined. Then add in the cornstarch and whisk until well combined.
Note - the order in which these are mixed is important as the cornstarch may be too thick if added in another order.
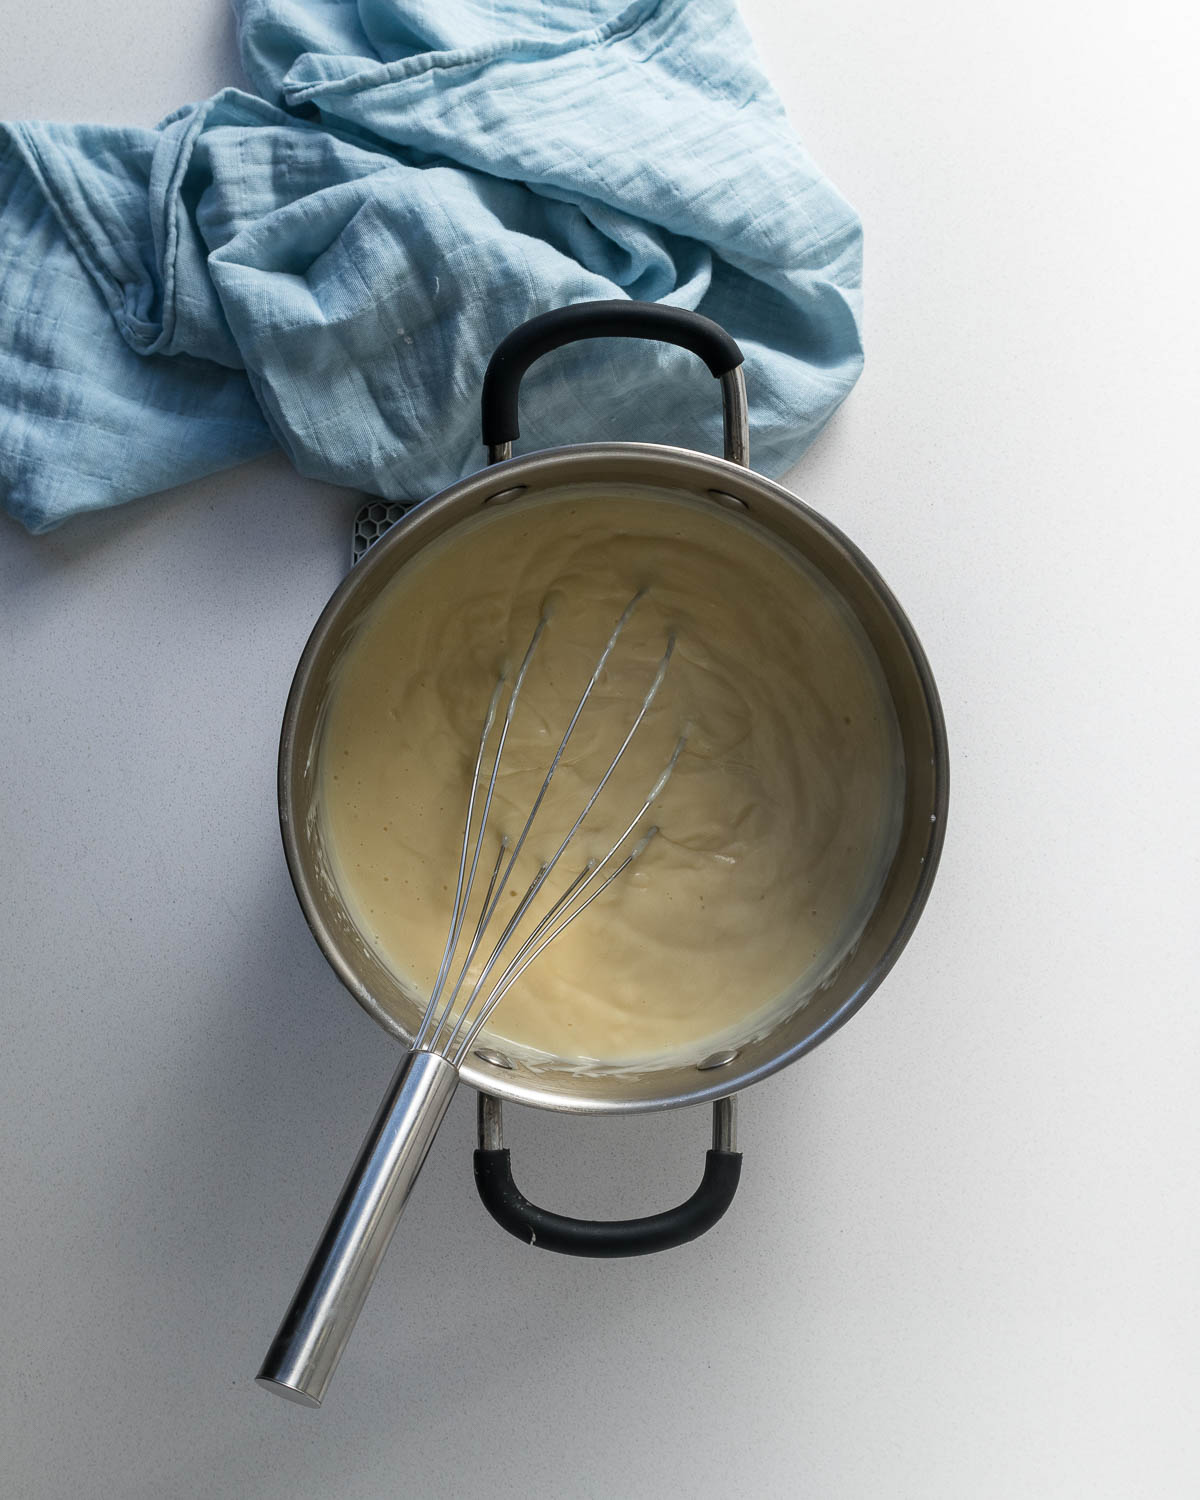
Step 3 - Bring the Milk to a Boil
Place the milk, condensed milk, vanilla and cinnamon sticks in a medium-sized pot. Bring to a boil, whisking occasionally to make sure the condensed milk has fully dissolved. Once the milk has come to a boil, turn down the heat to low and remove the cinnamon sticks.
Step 4 - Add in the Eggs
Rewhisk the egg mixture. Then slowly, while continuously whisking pour the egg mixture into the milk mixture. Whisk continuously while cooking the filling until it is thick, and the whisk is leaving a very distinct line in the filling. This will take between 5 and 15 minutes. Remove from the heat.
NOTE: The filling needs to be thick before pouring into or over the biscuit base. If it is not cooked enough, it will not be set in the fridge.
NOTE: If the filling seems to be a touch lumpy, simply press the filling through a sieve before adding it to the biscuit base.
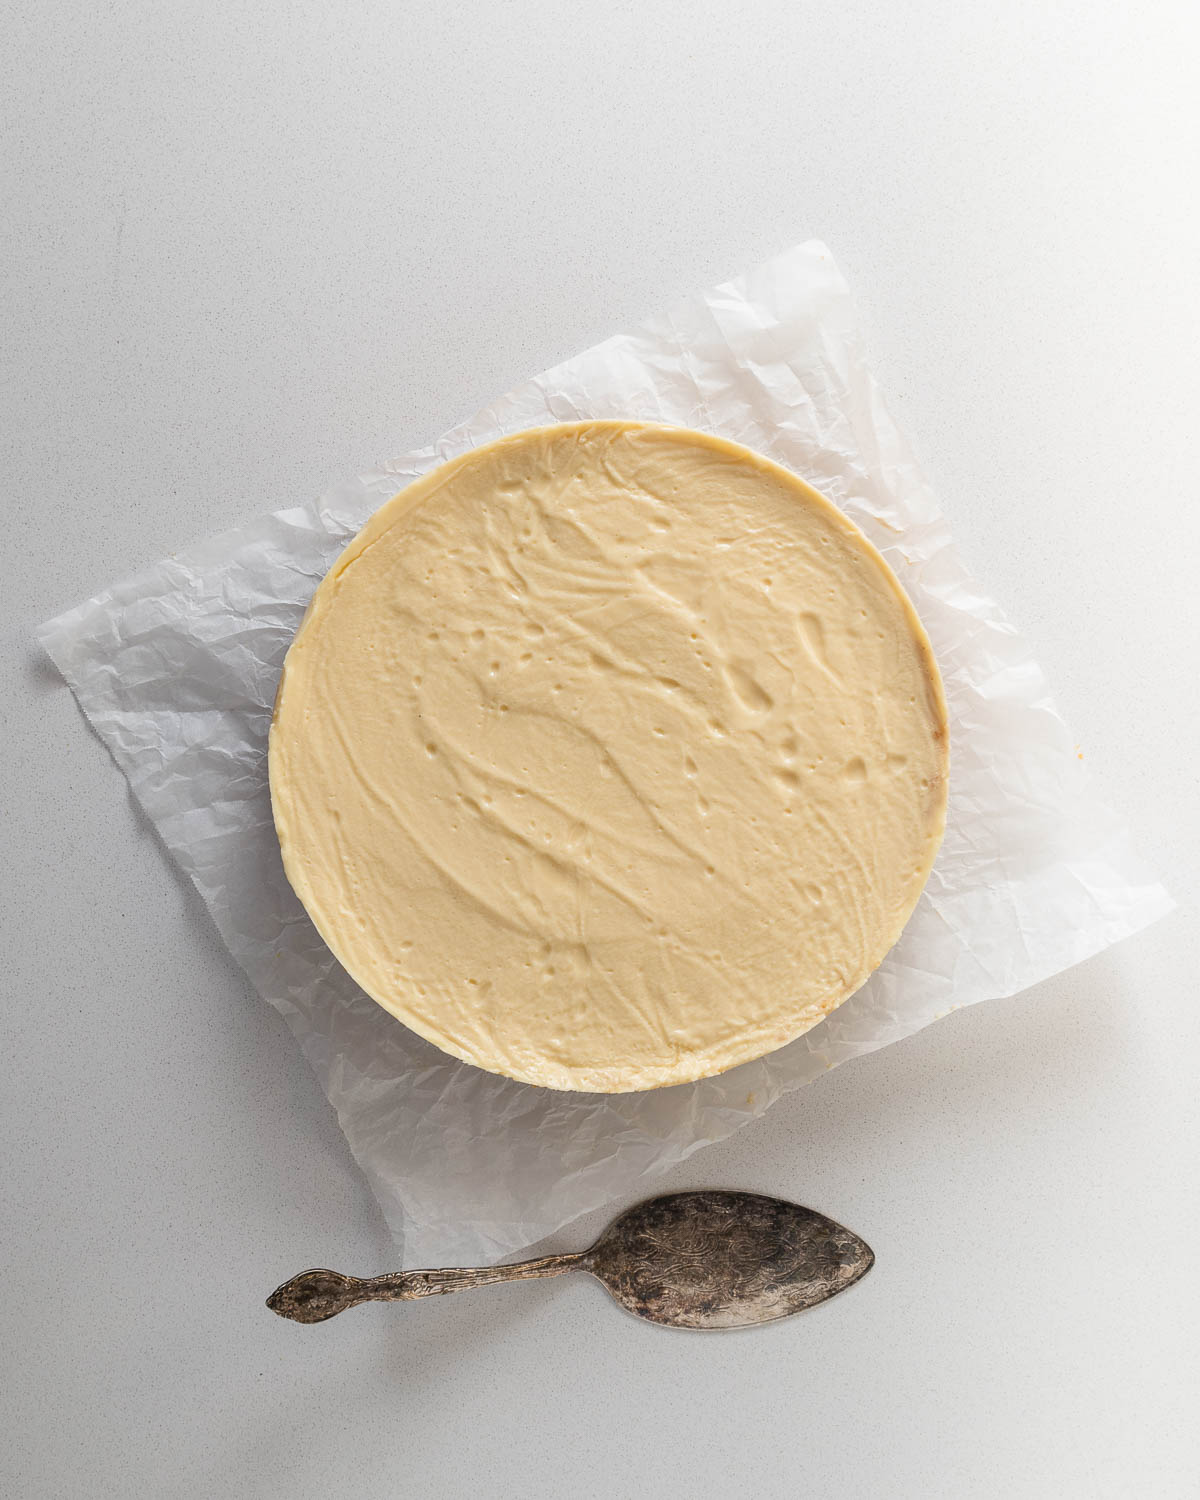
Step 5 - Fill the Biscuit Base
Allow the milk to cool for about 5 minutes whisking occasionally and then pour it into the prepared biscuit base. If using loose biscuits, they may move around a bit during the process. Just use a fork to gently prod them back into place.
NOTE: If using the springform pan with a pressed-in biscuit base, spin the tin to evenly distribute the filling within the tin.
Step 6 - Cover with Clingfilm
Cover the top of the filling with cling film or plastic wrap and allow it to cool until lukewarm at room temperature. Place in the fridge and allow to sit for at least 4 hours or overnight.
Step 7 - Sprinkle with Cinnamon
Gently remove the cling film and sprinkle with about 1 tablespoon of cinnamon. Slice, serve and enjoy.
Pro Tips for this Recipe
The biscuits must be processed until you have a sand-like consistency in 80% of the biscuits. Trust me - I tried with a courser grind the biscuit base just does not support the filling.
The eggs must be beaten with water before you add the cornstarch. Adding the cornstarch any early can make it near impossible to mix the ingredients together (a little non-newtonian science fun?).
The filling must be cooked until it is thick but soft. The whisk should be leaving distinct indentations in the mixture before being added to the biscuit base. If it is not cooked enough it will not set.
Original Recipe
A short note on the Original Recipe - I have updated my recipe since I first published it. I had two readers tell me that they could not get the filling to set, with other people telling me that they had a perfect no-bake milk tart.
So I decided to revisit the recipe and test it with less milk. If you liked the original recipe - this contained 850 grams of milk. And this has since been decreased to 720 grams of milk (3 cups) in the hopes of making this recipe foolproof. Please take note that this recipe works for me with 850 grams and 720 grams when the filling is cooked until it is thick and smooth.
More South African African Recipes
Storage and Freezing
This milk tart can be stored in the fridge for up to 5 days. Note on freezing - I have successfully frozen and defrosted this particular milk tart with little change to the consistency. Freeze for up to 6 weeks. Thaw the milk tart in the fridge (this can take up to 24 hours).
No Bake Milk Tart FAQ
Milk tart can be served as a dessert, by itself or with some tea and coffee.
Milk tart tastes similar to a custard tart or pie, but because of the higher milk-to-egg ratio has a milkier flavour.
This particular recipe is cooked on the stovetop, while my Traditional South African Milk Tart is baked in the oven.
Evaporated milk is fresh milk that has been heated until about 60% of the water content has evaporated. The cooking process here leaves a slight caramel flavour to the shelf-stable milk.
Condensed milk or sweetened condensed milk is fresh milk that has been heated until about 60% of its water content has evaporated and contains about 40 to 45% of sugar. This results in thick, sweet, shelf-stable milk that can be used in many desserts and drinks.
Rate & Review!
If you made this recipe, please leave a star rating! It gives my readers and me helpful feedback. If you want more recipes, subscribe to my newsletter, and follow me on Instagram, Pinterest, and Facebook!
Recipe Card
No-Bake Milk Tart
Equipment
- 9" round (23cm) Springform Pan (or a baking dish that will hold about 1.2-1.5L of liquid)
Ingredients
Biscuit Base
- 200 grams Tennis Biscuits (1 packet - crushed or processed)
- 100 grams butter (melted)
Milk Tart Filling
- 4 large eggs number 7
- 45 ml water
- 60 grams cornstarch
- 720 grams milk (whole/full-fat)
- 395 grams sweetened condensed milk (1 tin/14 oz.)
- 1 tablespoon vanilla extract
- 2 cinnamon sticks (quills)
- 1 teaspoon table salt
- 1 tablespoon ground cinnamon
Instructions
Biscuit Base Option 1
- Line a glass dish (that can hold about 1.2-1.5L) with tennis biscuits and set it aside.200 grams Tennis Biscuits
Biscuit Base Option 2
- Take a piece of square baking paper about 2 inches or 5cm larger than a 23cm springform tin. Crinkle the paper into a ball and then place it over the base of the tin. Press the paper into the corners of the bottom of the base (you may need an extra pair of hands here), before clipping on the sides of the tin.
- Finely processor crushes the tennis biscuits until about 80% of the biscuits have a sandy texture. Then mix in the melted butter. Pour the mixture into the tin and press down tightly into the bottom, and up the sides (about 3cm or just over an inch). The sides don't need to be thicker than about 2-3mm. Place in the fridge for an hour.200 grams Tennis Biscuits, 100 grams butter
Filling
- Whisk together eggs and water until well combined. Then add in the cornstarch and whisk until well combined.4 large eggs, 45 ml water, 60 grams cornstarch
- Place the milk, condensed milk, vanilla and cinnamon sticks in a medium-sized pot. Bring to a boil, whisking occasionally to make sure the condensed milk has fully dissolved. Once the milk has come to a boil, turn down the heat to low and remove the cinnamon sticks.720 grams milk, 395 grams sweetened condensed milk, 1 tablespoon vanilla extract, 2 cinnamon sticks, 1 teaspoon table salt
- Rewhisk the egg mixture. Then slowly, while continuously whisking pour the egg mixture into the milk mixture. Whisk continuously while cooking the filling until it is thick, and the whisk is leaving a very distinct line in the filling. This will take between 5 and 15 minutes. Remove from the heat.
- Allow the milk to cool for about 5 minutes whisking occasionally and then pour into the prepared biscuit base. If using loose biscuits, they may move around a bit during the process. Just use a fork to gently prod them back into place.
- Cover the top of the filling with cling film or plastic wrap and allow it to cool until lukewarm at room temperature. Place in the fridge and allow to sit for at least 4 hours, preferably overnight.
- Gently remove the cling film and sprinkle with about 1 tablespoon of cinnamon. Slice, serve and enjoy.1 tablespoon ground cinnamon
Notes
Nutrition
Nutrition information is an estimate. If scaling the recipe remember to scale your cook and bakeware accordingly. All temperatures stated are conventional, unless otherwise stated. Recipes tested in grams and at sea level.
Yogie says
Tried the receipe and it was perfect and yummy
Cindy says
Hi! I want to try out your filling recipe, however I already have precooked mini tarts. Would this work well as the base?
Mary-Lou says
Yes, it would work 100%. Many moons ago, before I had this website I used store-bought baked mini tart shells and just spooned the filling into it.
Good luck!
Cindy says
Thank you for the prompt response!
Tracy says
Wonderful recipe - thanks! One of the best I’ve tried for the most authentic non-bake Milk Tart loved by South Africans across the world.
I used five medium eggs instead as this is what I had available at the time but worked as good sub ratio to four large. Tart was creamy, firm and is relatively easy to make. I say ‘relatively’ as a seasoned home baker I know that pouring the beaten egg mix into scorching milk can turn into a disaster pretty quickly(scrabbled eggs), so for anyone making this for the first time, I would advise patience and a slow steady stream of egg into milk while stirring continuously until it all comes together like custard. I always temper the mixture first with a few short drizzles of egg mix before slowly pouring in the rest of the eggs. Reminds me of Spar’s Milk Tart from many decades ago. Delicious!!🩷
Debbie says
Hi Mary-Lou, was wondering if the recipe would still work well if I leave out the condensed Milk and maybe just use 1/2 cup of castor sugar? Would I need then to adjust anything else in the recipe? Please would you advise quantities is this is the case. I've previously made the condensed milk version milk tart and I find it just too sweet.
Thanks
Mary-Lou says
Hi Debbie,
In my traditional milk tart, which is baked I use 130g of sugar. So if you swop out the condensed milk for 100-130g of sugar and make as per normal, adding in the sugar when you add in the condensed milk, should work out fine as a direct swop.
If you go with a little less sugar (if you are tempted to go lower than 100g/ 1/2 cup), and find that the final tart is begging for a little extra sweetness once it has set, simply sprinkle with some cinnamon sugar.
Happy milk tart making!
Debbie says
Thanks you for your response , just wanting to ask if I then replace the condensed milk with sugar instead , would the quantity of cornflour remain the same ? , considering there would be less liquid
Mary-Lou says
Hi, the cornstarch will remain the same. It's the same amount used in my traditional milk tart. Which works perfectly fine with slightly less liquid.
Debbie says
Hi Mary-Lou
I am wanting to try your milk tart recipe, but I only have 23cm or 24cm round glass pies dishes. I am wanting to use the crushed biscuit base when I make it, but thinking it may be too much liquid for the 23cm pie dish? I also have a 24.5 x 22cm square glass dish, please would you kindly advise which would be my best option.
Thanks
Debbie
Mary-Lou says
Hi Debbie,
I would measure how much liquid (water) the pie dishes or square dishes hold. Simply take a cup measure and count how many cups of water the dish holds.
This recipe calls for a dish that holds between 1.2 and 1.5L of liquid. For reference, for my traditional milk tart (baked in the oven), I used a 24cm deep dish pie dish which holds around 1L of liquids. This recipe has slightly less filling (as it is made with sugar and not condensed milk) and fits in there just fine.
Hope it comes out amazingly!
Regards,
Mary-Lou
Kathryn says
Turned out great. The filling set well and was just right sweetness. I used griffins krispie biscuits on the bottom & sides of tin. Family loved it!