


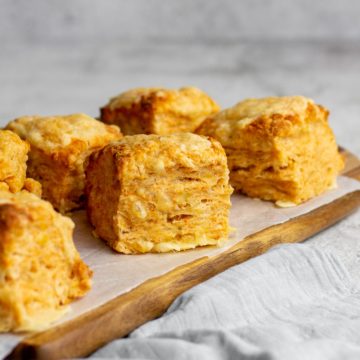
These easy, light, and fluffy cheese scones come together in a matter of minutes. Flavored with cheddar, parmesan, and spices, enjoy these scones hot out of the oven with a smattering of butter.
These are honestly the best cheese scones I have ever had. The best cheeses to use are mature cheddar with some parmesan, however, these are fantastic when made with cheddar cheese only. Additionally, these buttery cheddar cheese scones can be flavored with mustard powder, cayenne pepper, and paprika for a spicy version.
Jump to:
What are Scones?
A scone is simply a baked good that can be either sweet or savory. Scones originated in Cornwall, England but are enjoyed in my home country of South Africa, and are quite popular here in New Zealand and in Australia.
I love savoury scones, whether it's plain cheese like this one or flavored with onions or chives.
A savory scone here is very similar if not the same as a savory biscuit in the USA.
Why This Recipe Works
- This easy cheese scone recipe comes together in 20 minutes and is filled with delicious flaky layers that result in tender scones.
- Light and fluffy cheese scones straight from the oven make for a delicious breakfast or brunch.
- Flaky cheese scones are perfect for an afternoon tea or an addition to the lunch box.
- Because milk is used to brush the tops of these savory scones, it is a completely eggless recipe.
Ingredients
Here are some notes on the ingredients, please refer to the recipe card for full details.
Flour - plain flour, standard grade, or all-purpose flour is used to make these cheese scones.
Self-rising or self raising flour substitute - to make these scones with self-rising or self-raising flour, simply substitute the plain flour with self-rising and leave out the baking powder.
Make sure your baking powder is fresh (especially if you haven't bought some in a while) by placing a ½ teaspoon into a cup or bowl. Pour about a ¼ cup of boiling water over the baking powder. If it foams and bubbles it is still fresh.
Cold Butter (salted) adds flavor and gives a flakey tenderness to the scones. As the scones bake, the steam released from the butter raises the scone (in conjunction with the baking powder) and leads to a flakey, soft, and fluffy scone. Butter adds flavour, softness, and moisture and sometimes aids in the leavening of baked goods. I use New Zealand butter in my recipes, which has approximately 82% butterfat and can be very yellow (similar to European or Irish butter). Butter cannot be substituted with butter or margarine spreads, but it can be substituted with baking margarine.
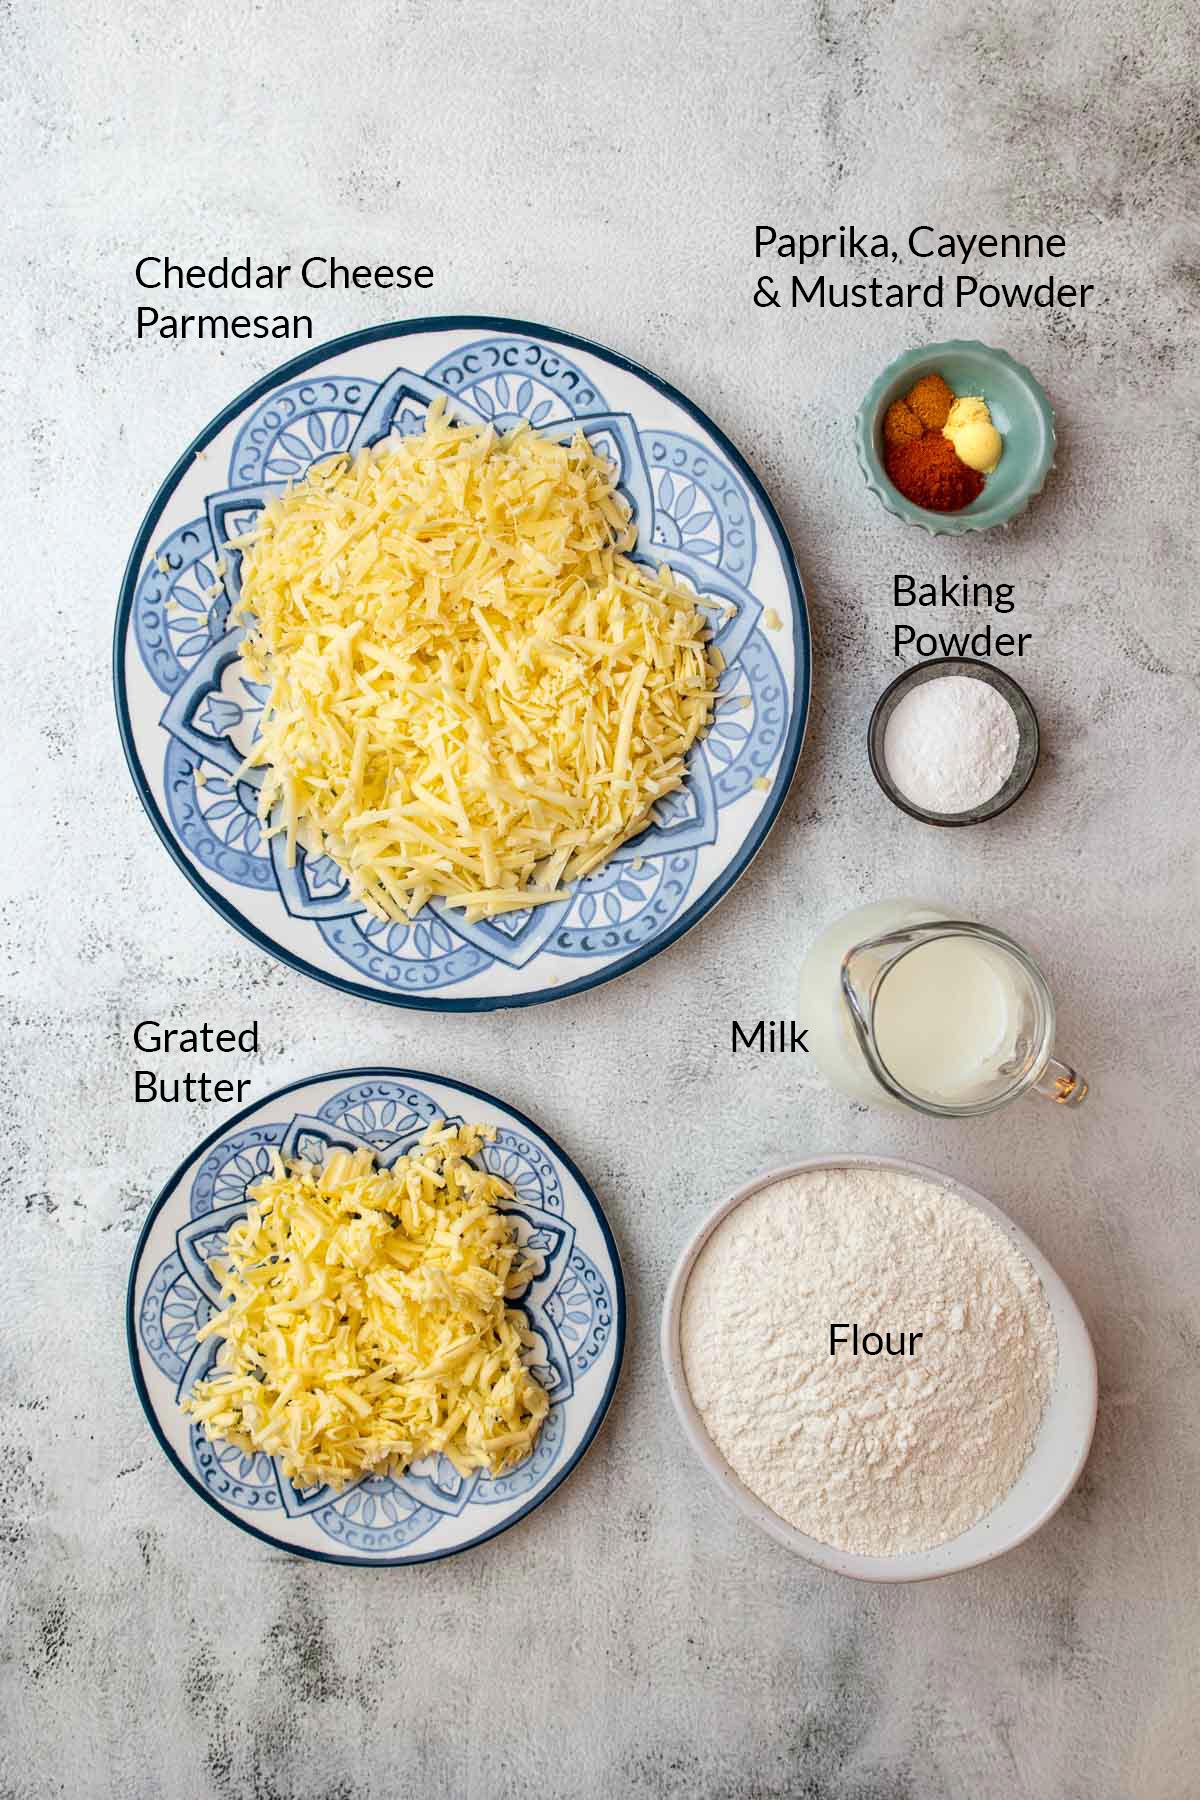
Parmesan adds a nice strong cheese flavor, but if you don't have parmesan on hand, simply substitute out with cheddar.
Cheddar - preferably mature cheddar or vintage cheddar, but tasty cheese (regular cheddar) will do just fine, particularly when paired with parmesan.
Milk adds moisture to the scones. Whole milk or lower-fat options can be used.
Mustard powder, cayenne pepper, and paprika add a nice depth of flavor and a bit of spiciness to the scones. These are optional and can be left out to make plain cheese scones.
Note - there is no added salt in this recipe because cheese can be rather salty, I opted for salted butter, and the baking powder also contains salt. However, if using unsalted butter add ¼ - ½ teaspoon of table salt.
Weighing & Measuring Ingredients
Weighing ingredients with a kitchen scale is more accurate than using measuring cups. All my recipes are developed and tested using grams only.
However, I have activated the metric-to-cup conversions. Simply click on "cups" or "metric" for your preferred measurements. For these conversions, cups are equal to 240 millilitres/8 fluid ounces, tablespoons are 15 milliliters and teaspoons are 5mL.
Step-by-Step Instructions
NOTE - all ingredients must be cold for this recipe.
Step 1 - Preheat the oven to 220°C/200°C Fan. Line a baking tray or baking sheet with baking paper or parchment paper.
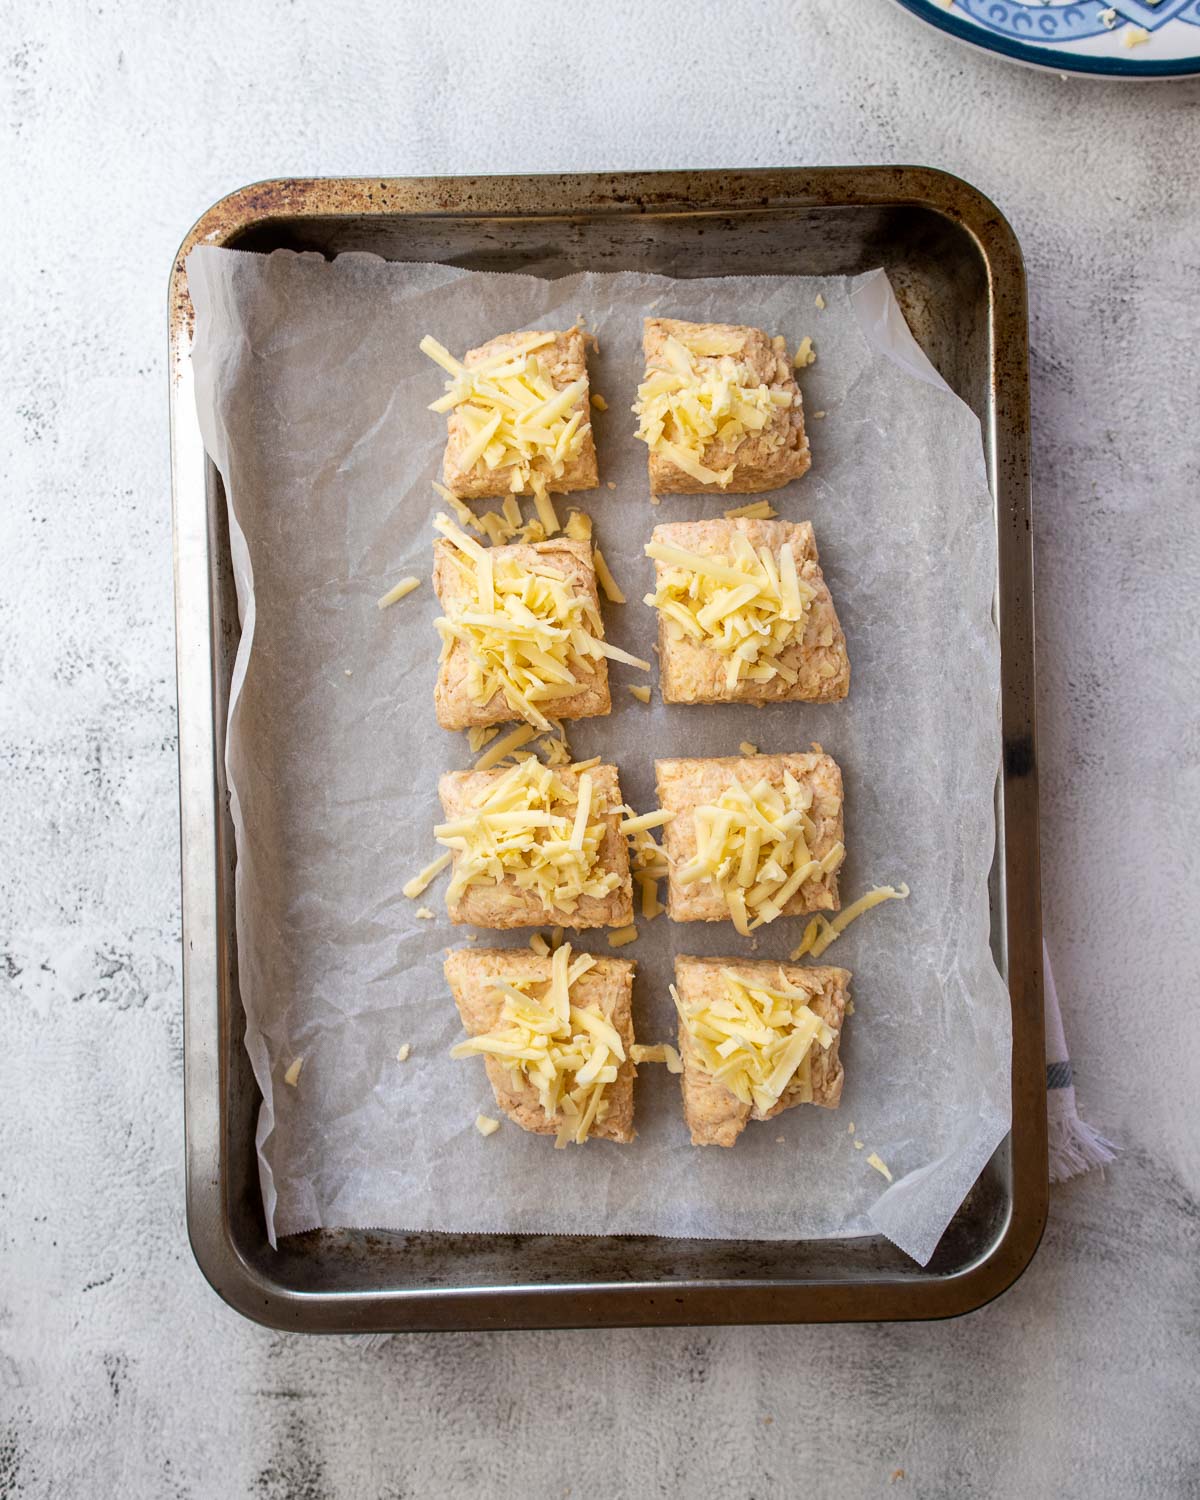
Step 2 - Grate the cheeses, keeping aside approximately 40 grams of the cheddar to place on top of the scones before baking.
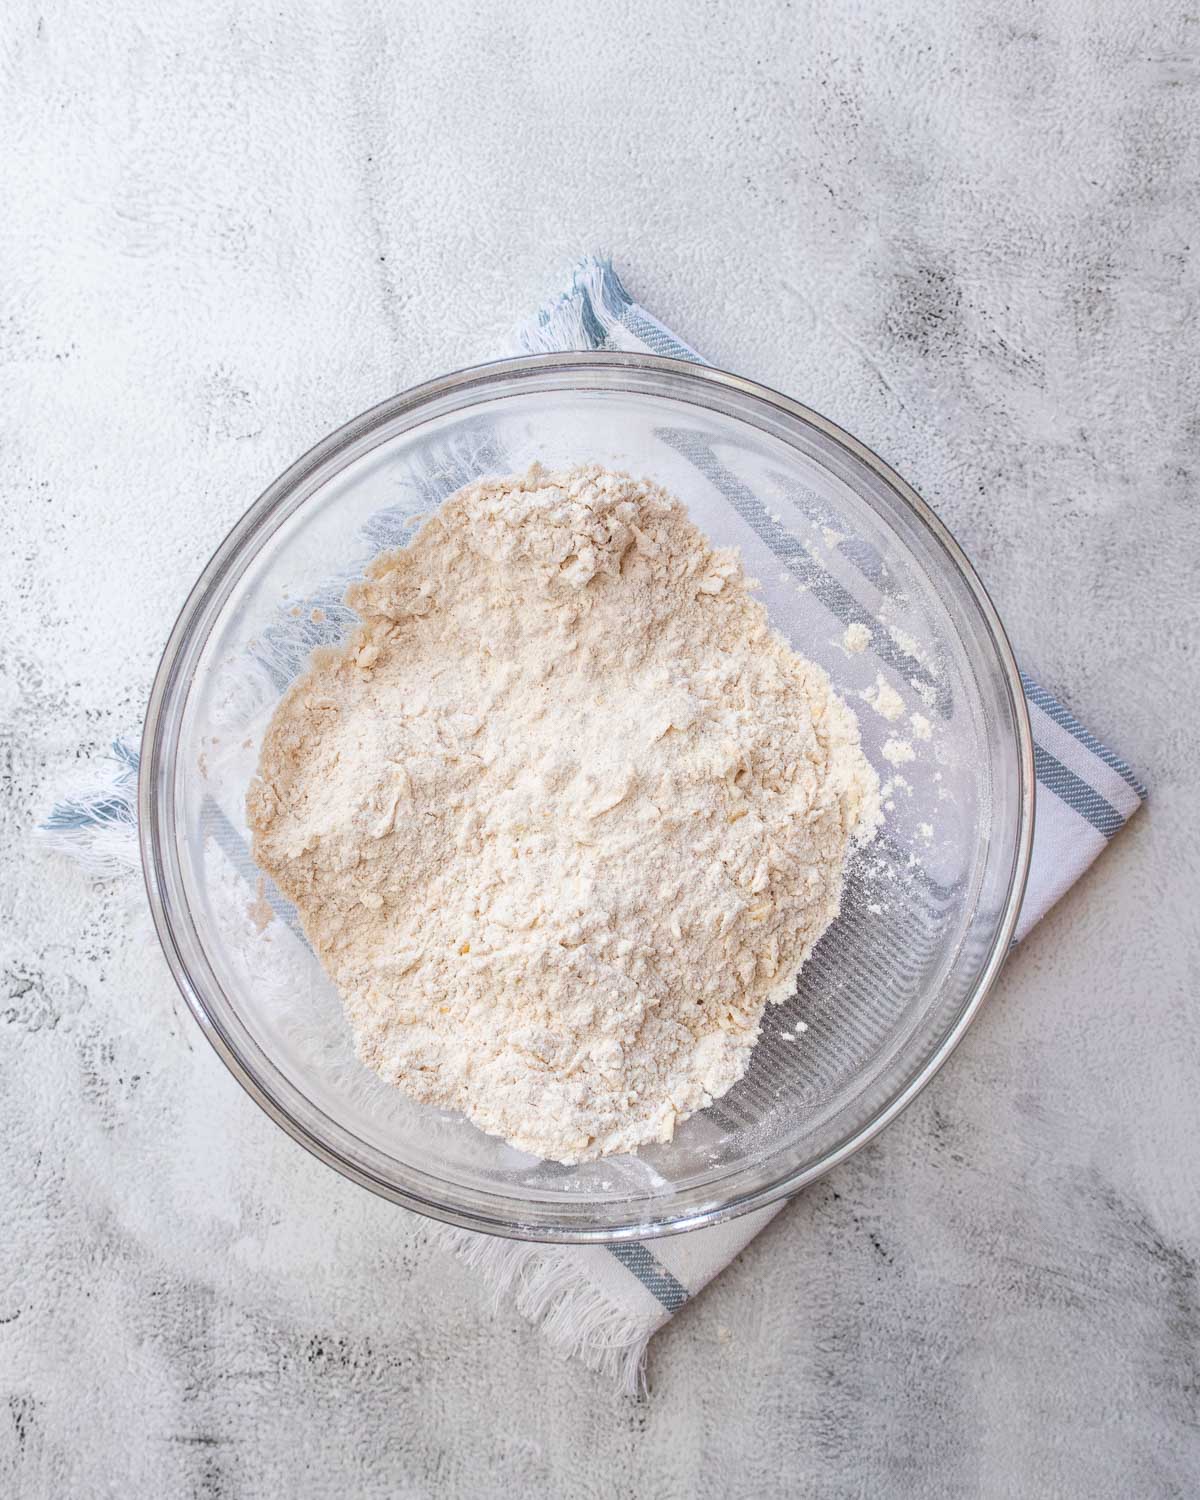
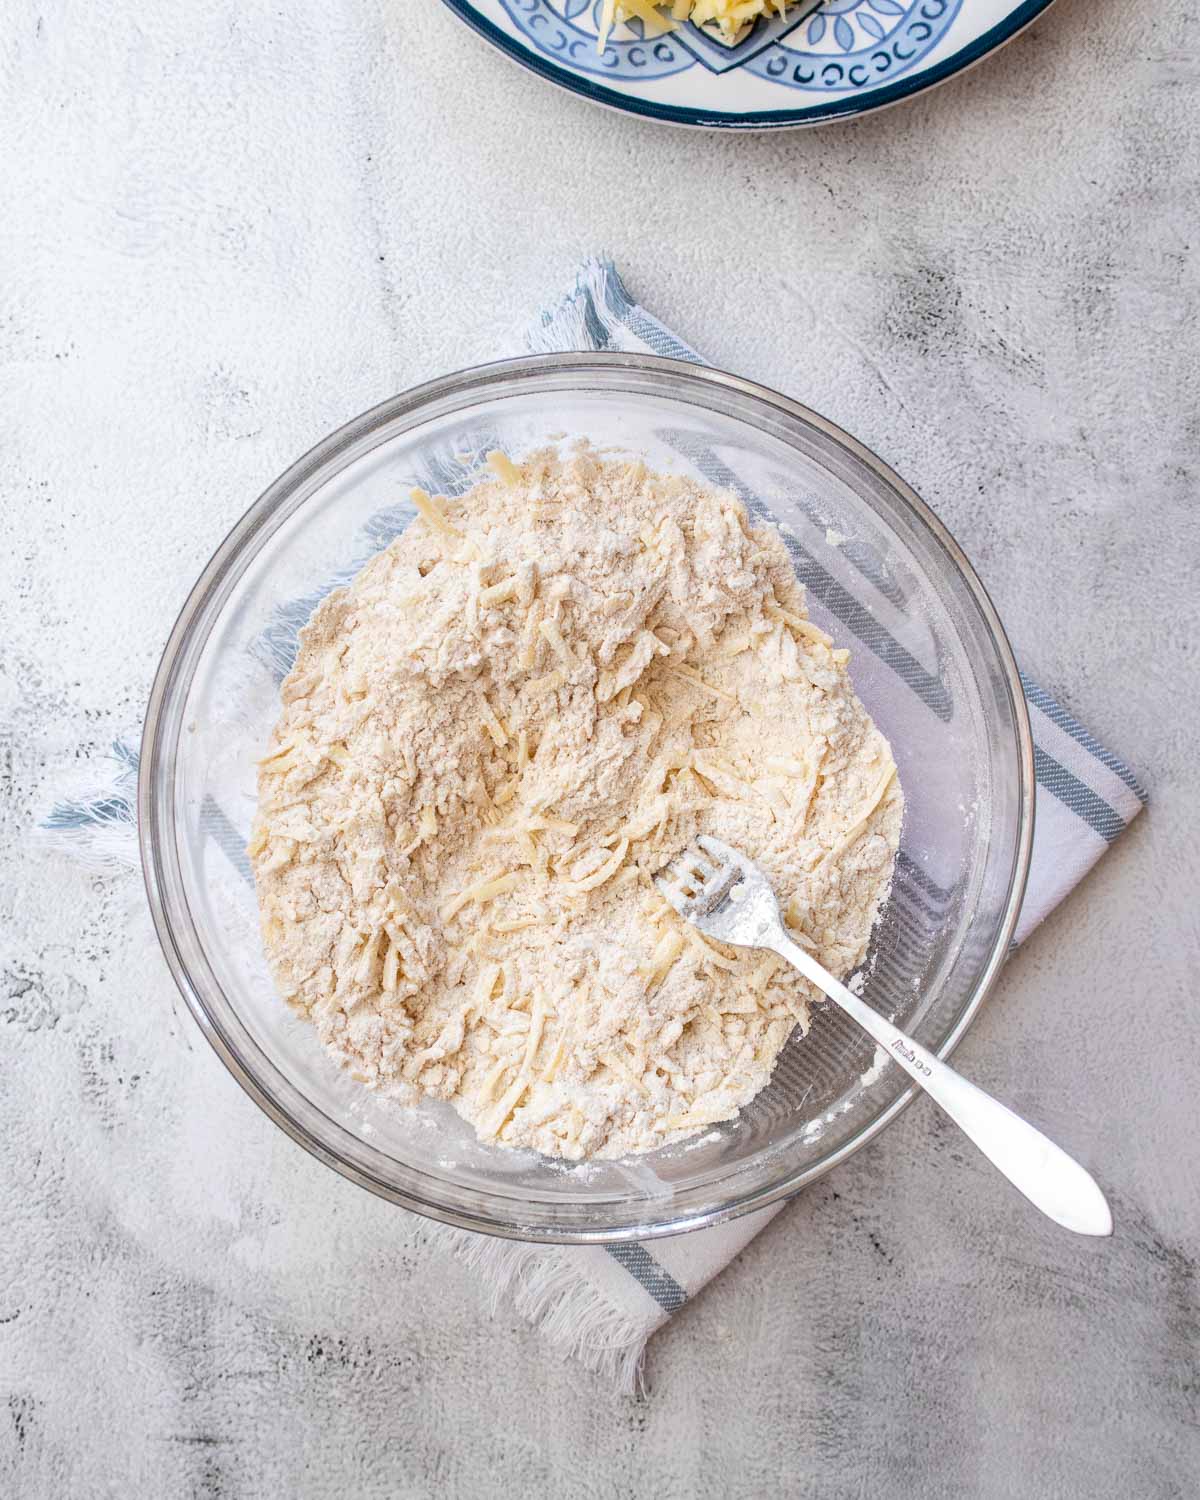
Step 3 - In a large bowl whisk together the flour, baking powder, salt, mustard, cayenne pepper, and paprika. Grate the butter or cut it into small blocks. Rub the butter into the dry ingredients until it resembles fine breadcrumbs with some small pieces of butter scattered throughout the flour (or work the butter into the flour using a pastry cutter). Add the grated cheese into the flour, and mix through with your fingers until well distributed.

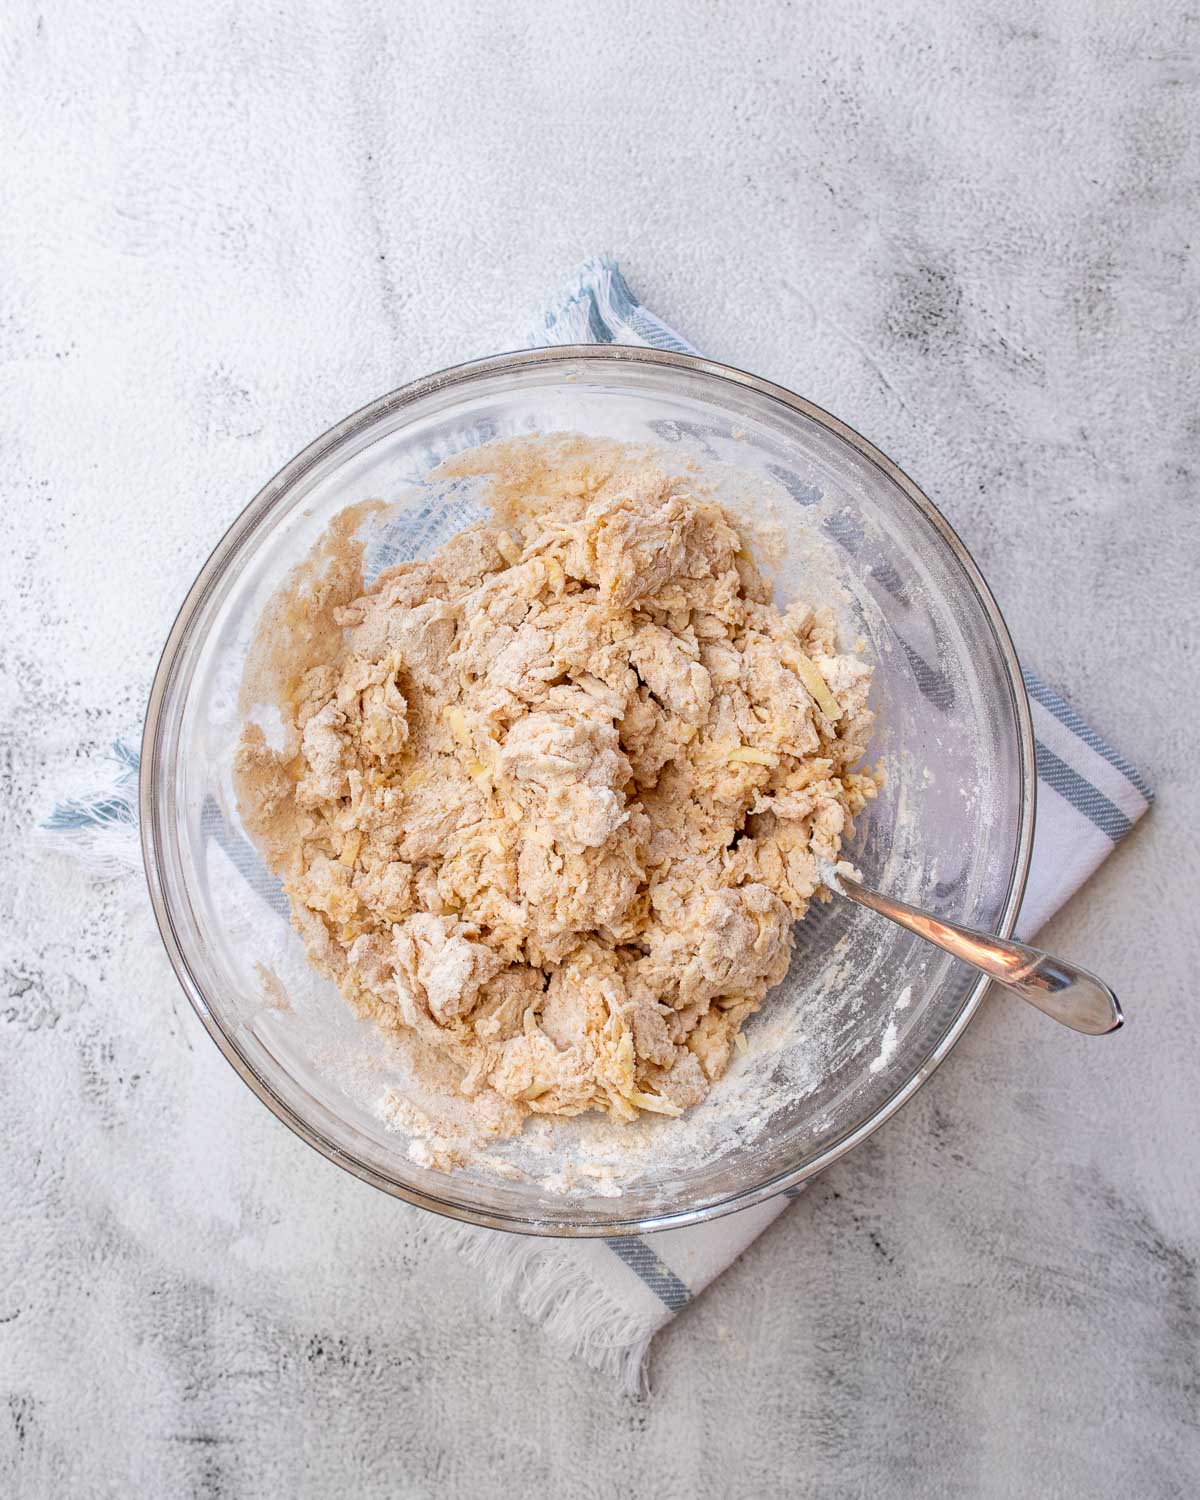
Step 4 - Pour the milk into the flour mixture, using a fork, stir to make a rough dough.
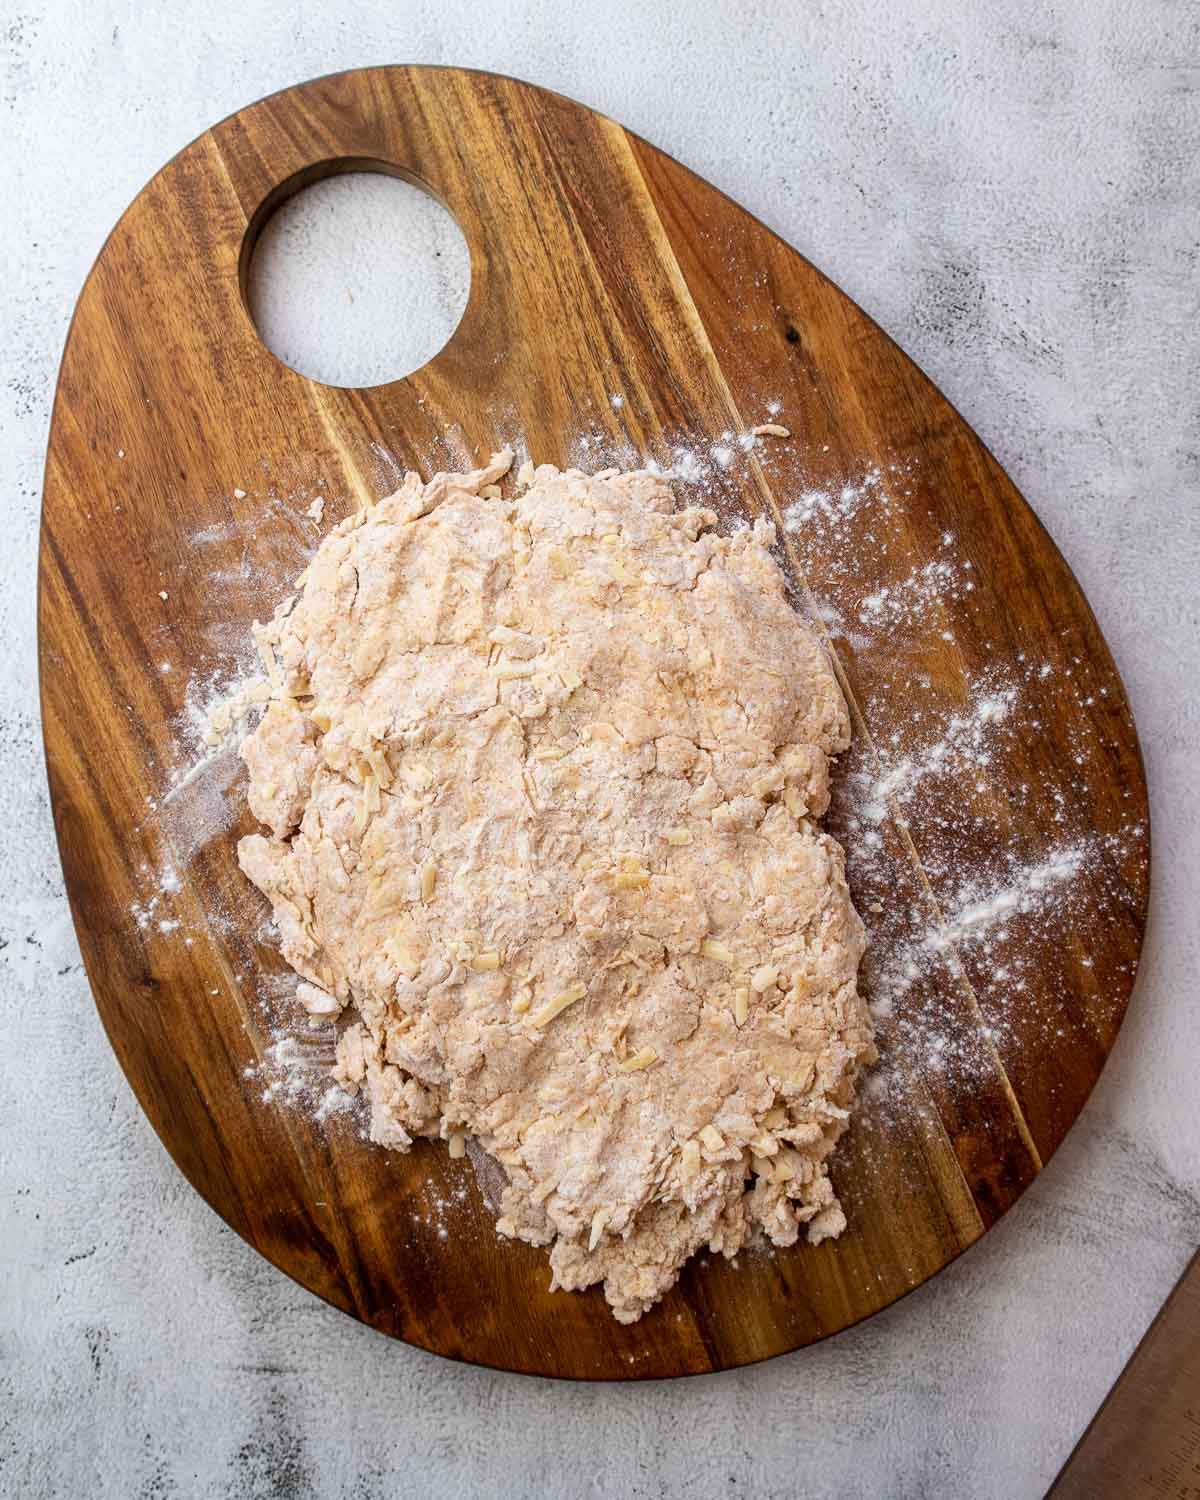
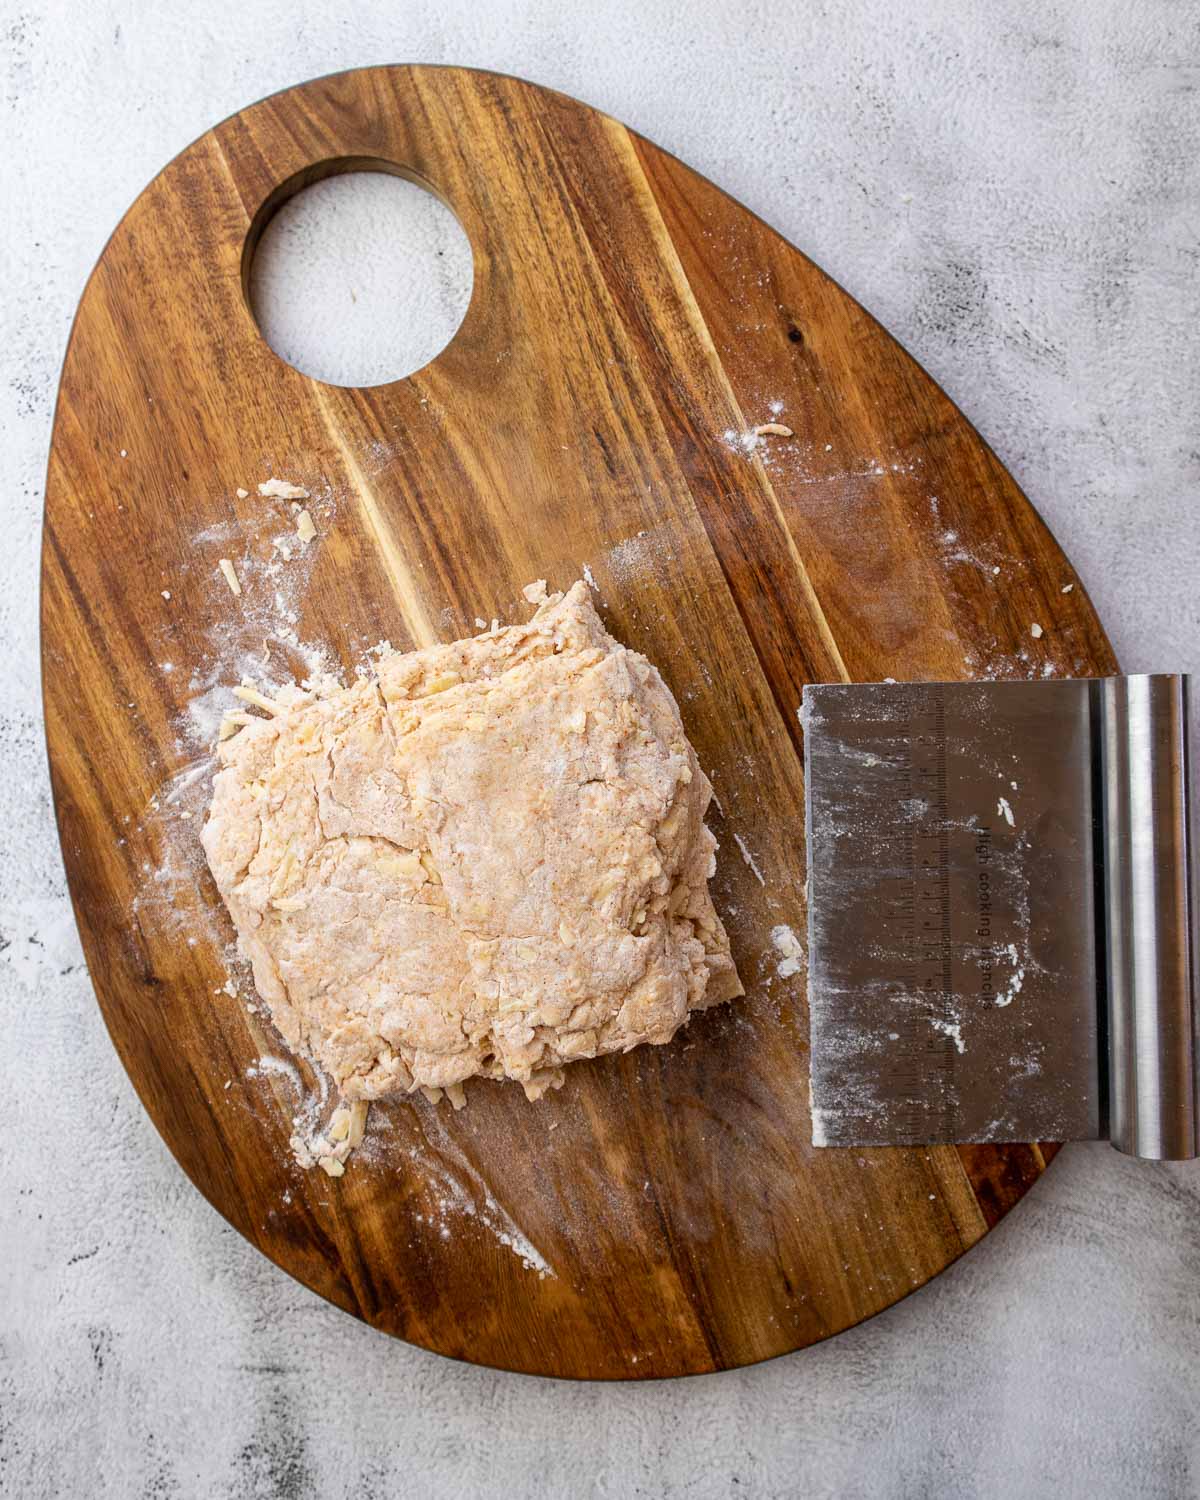
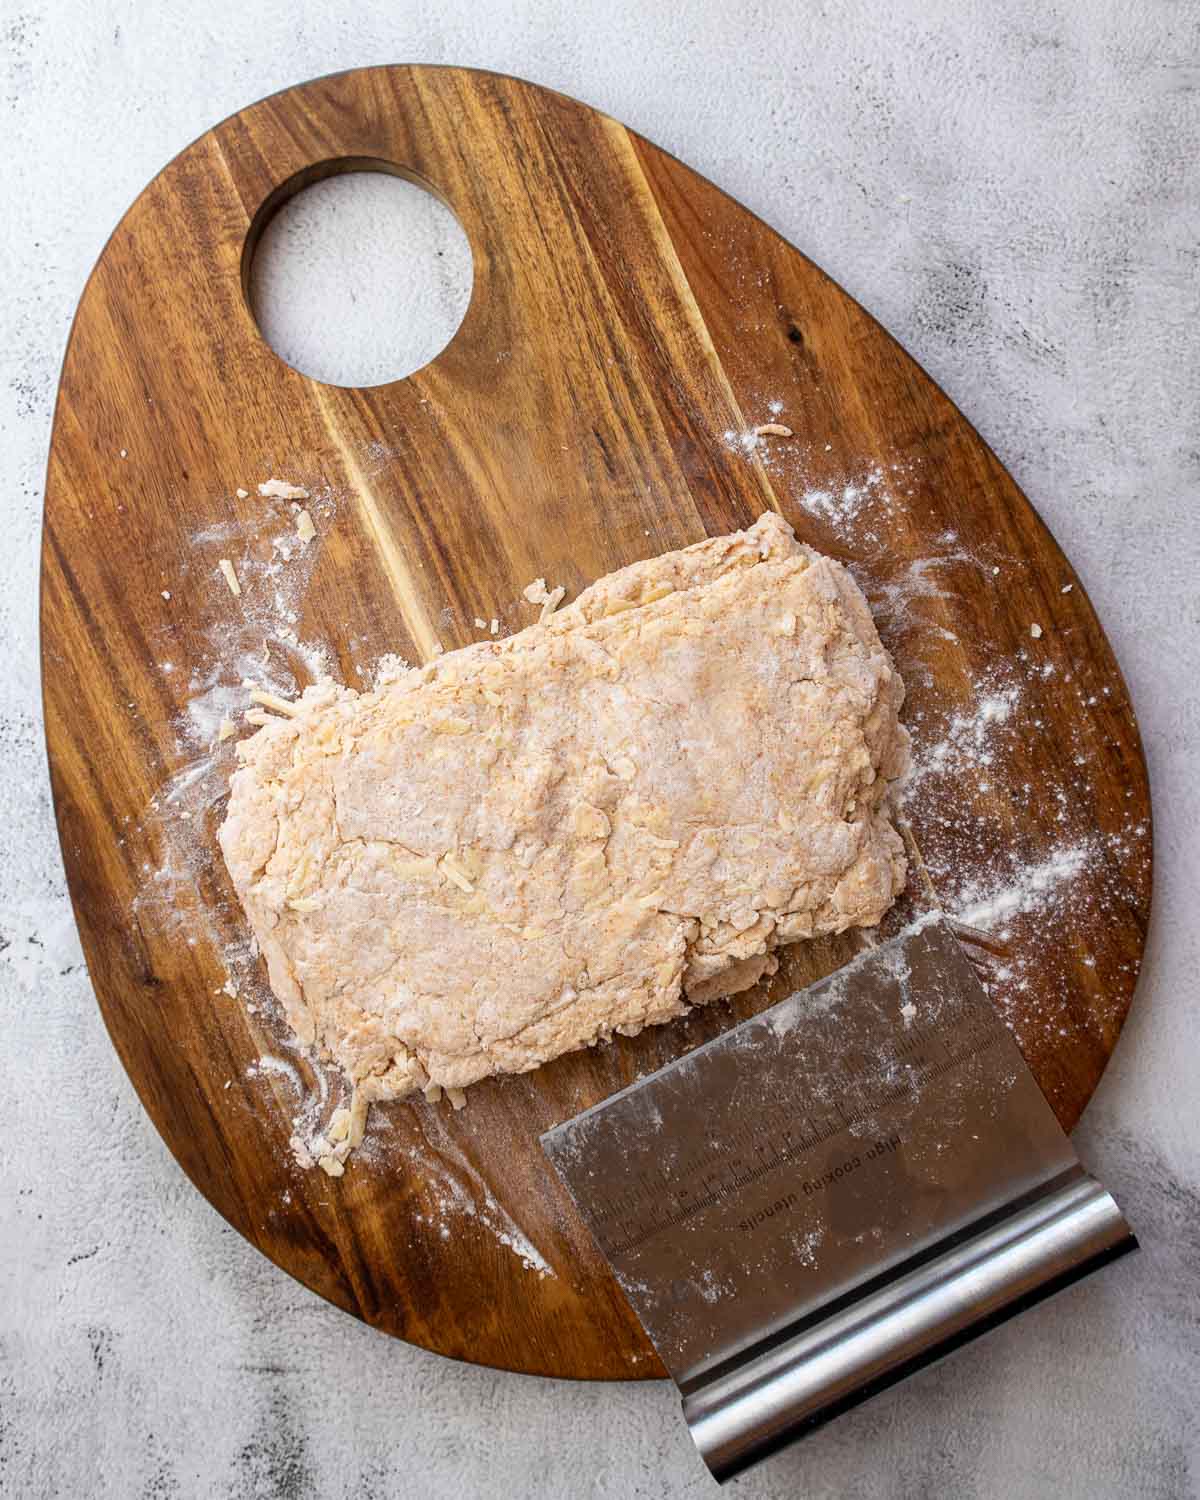
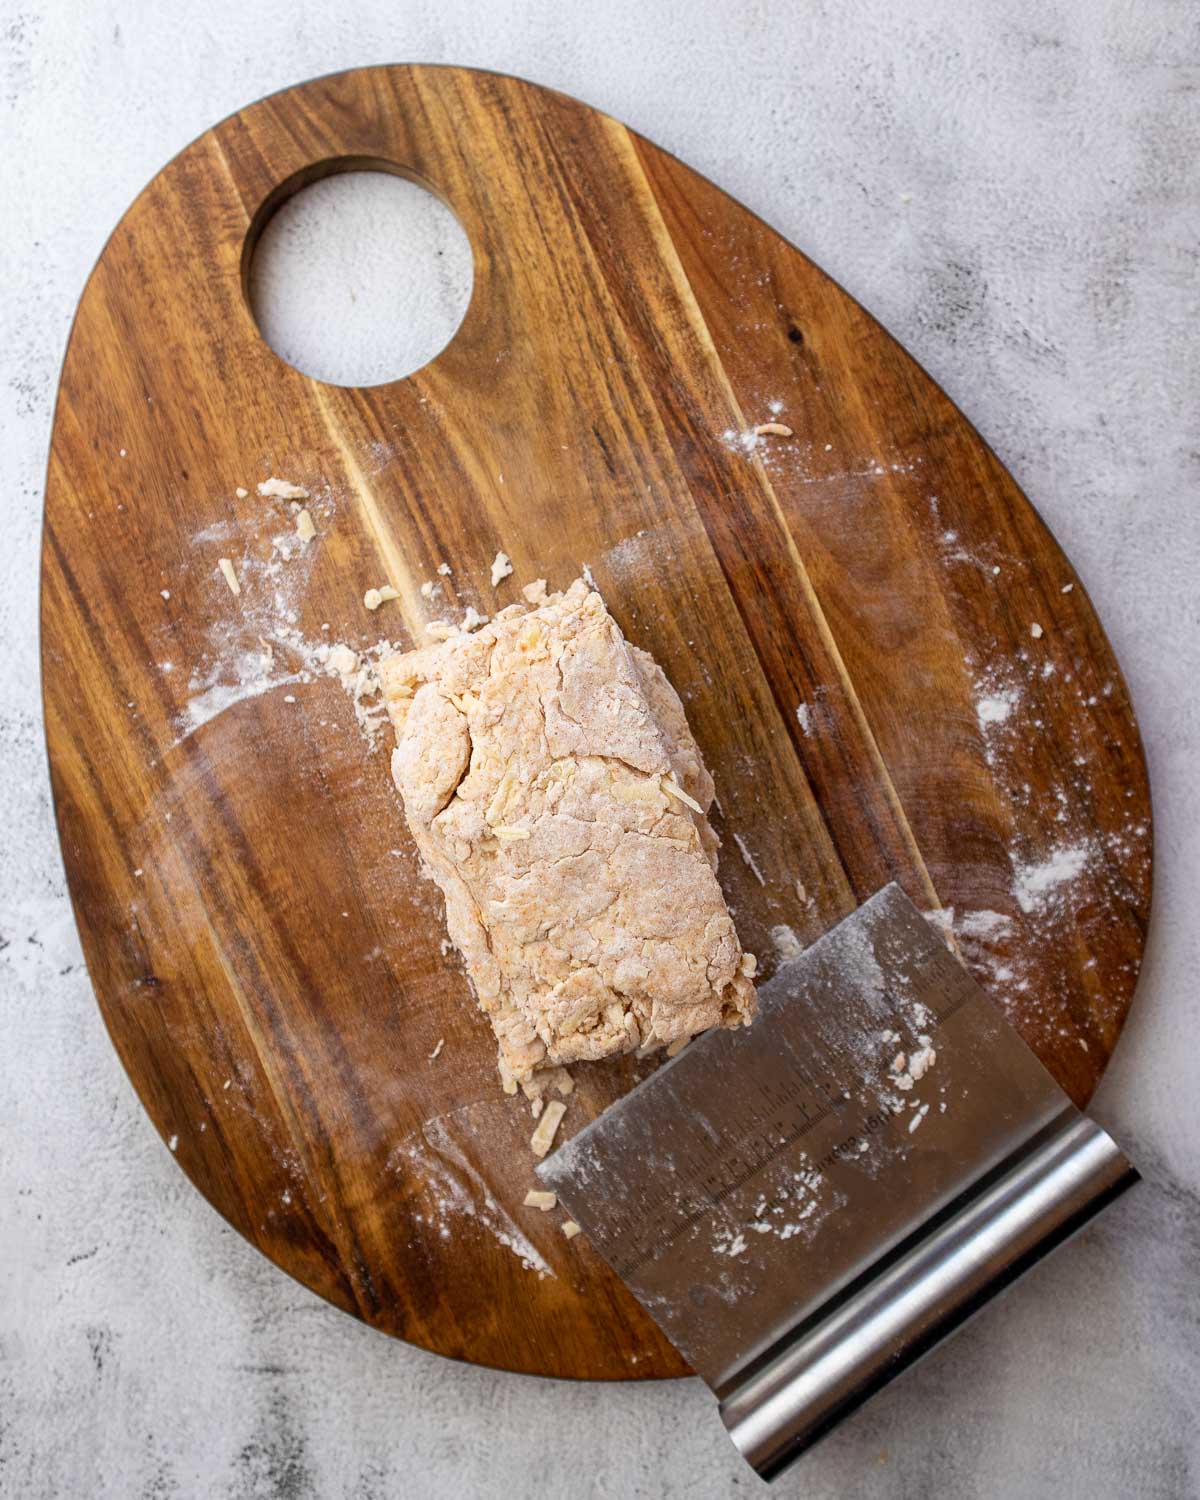
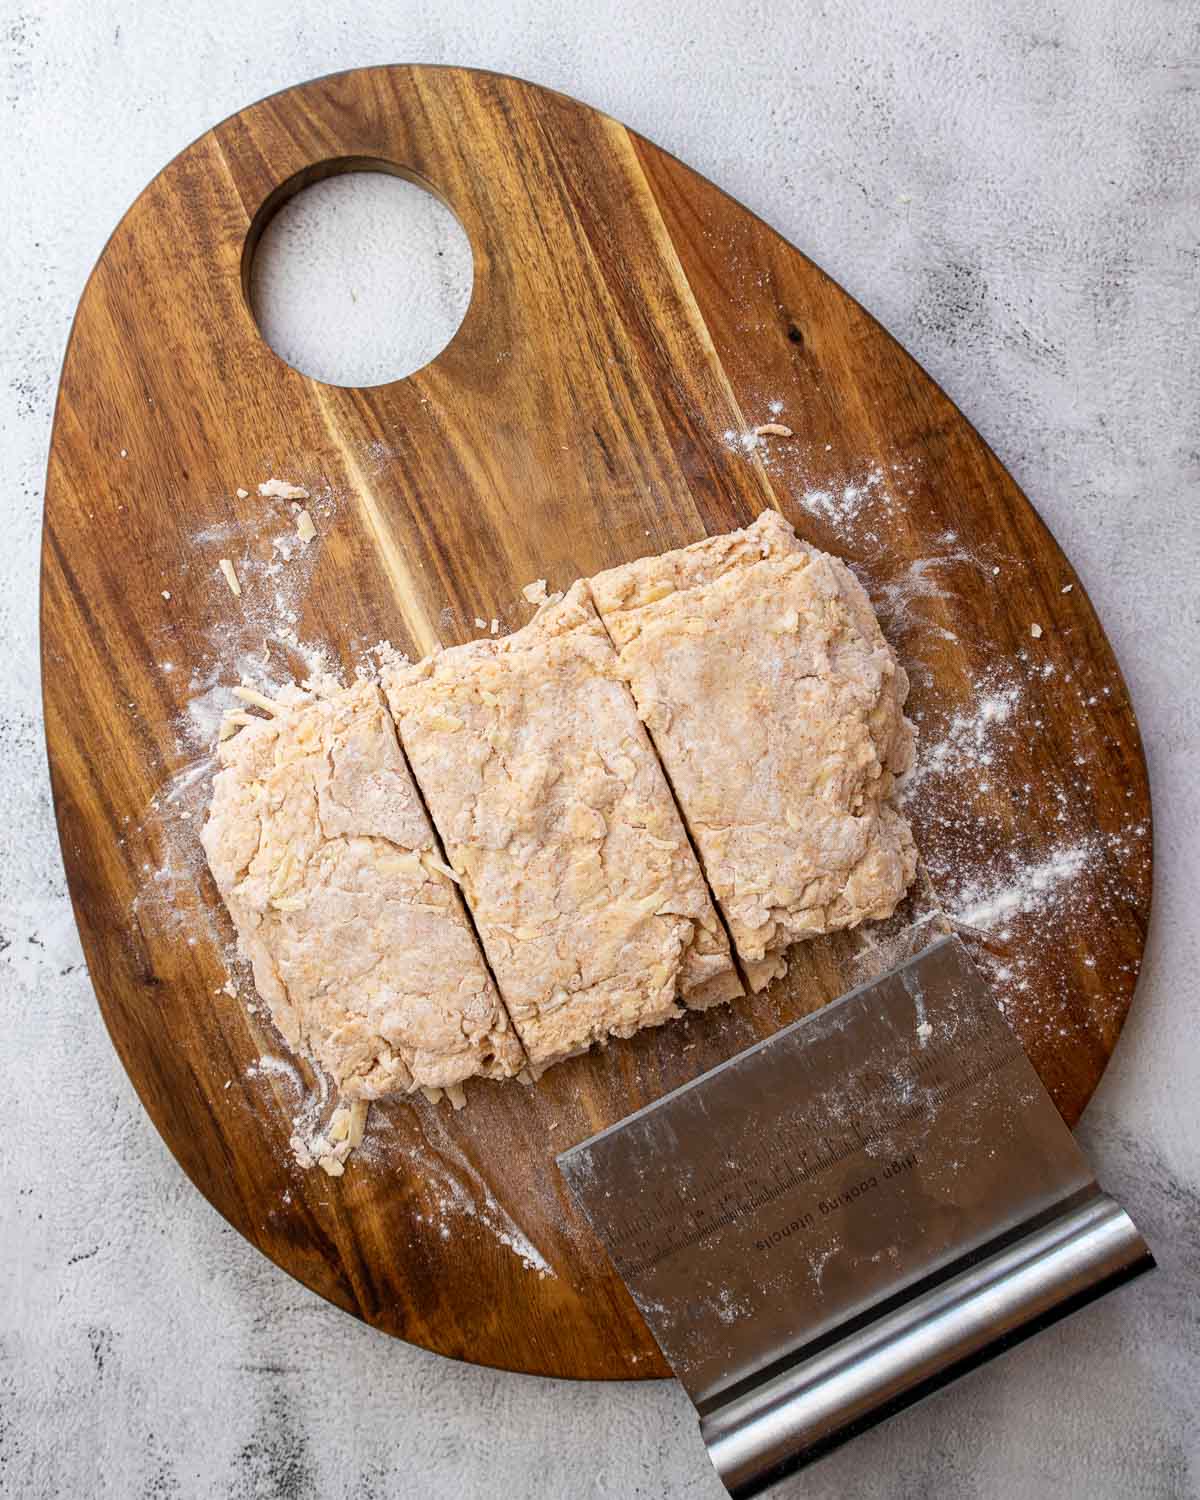
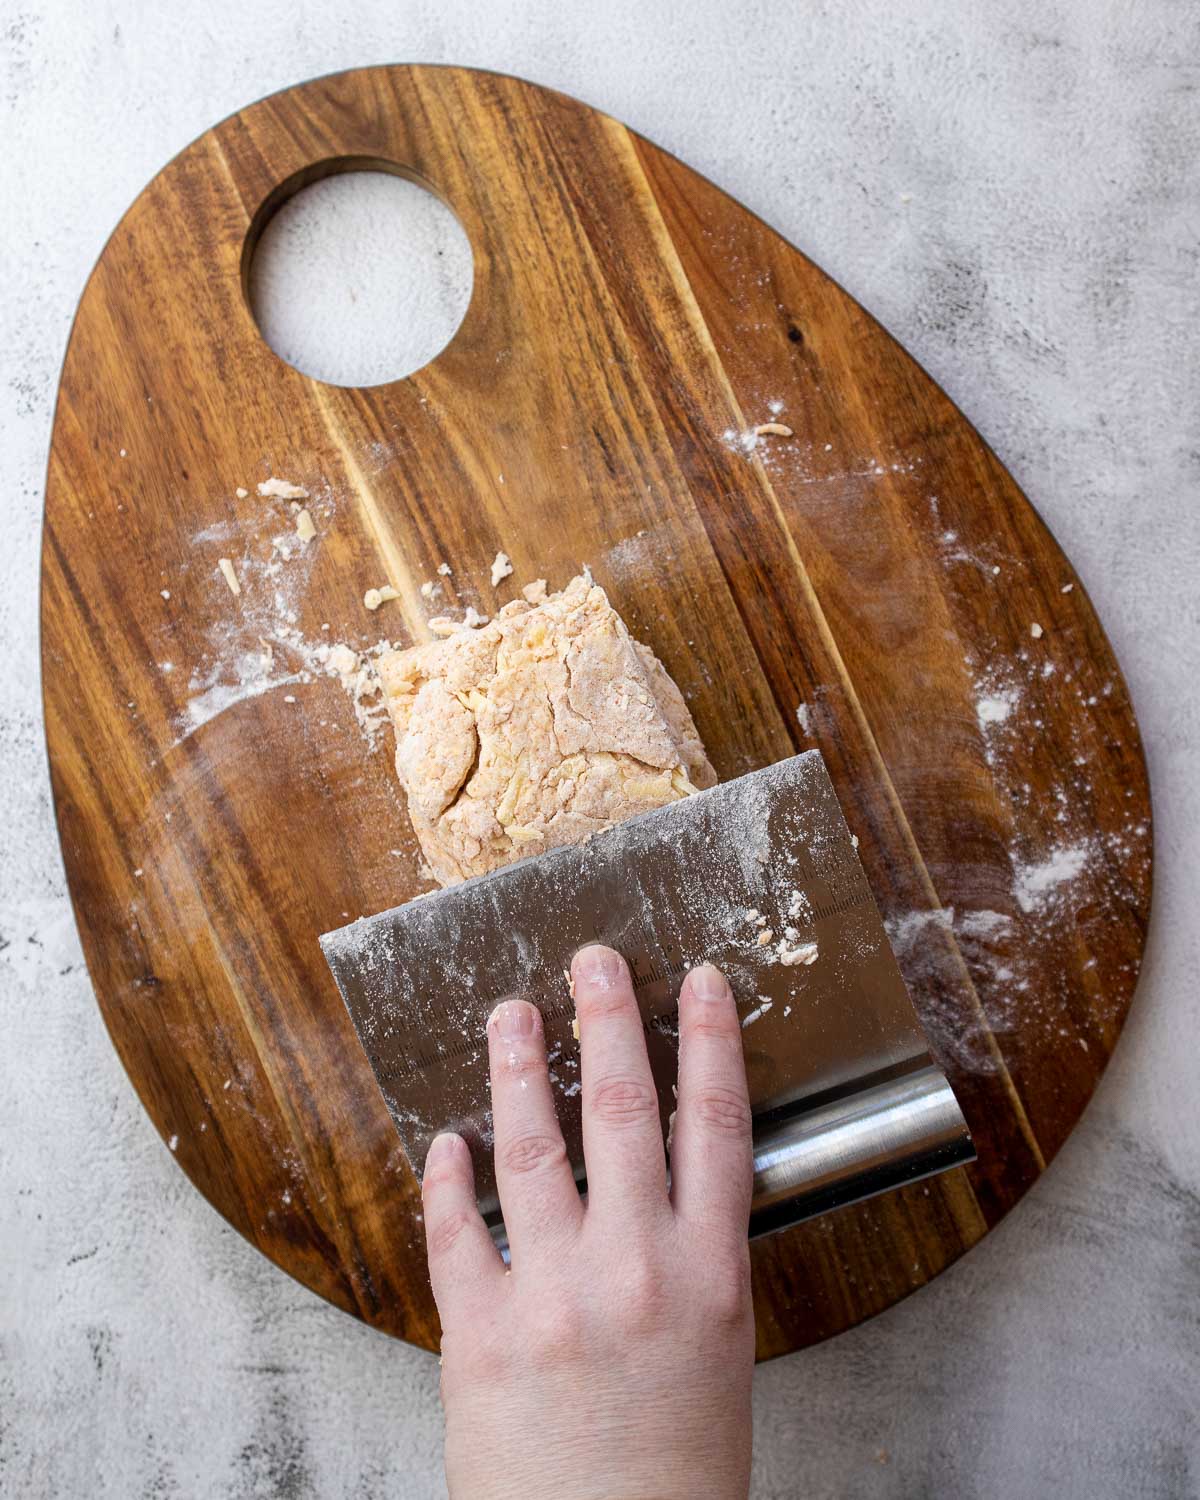
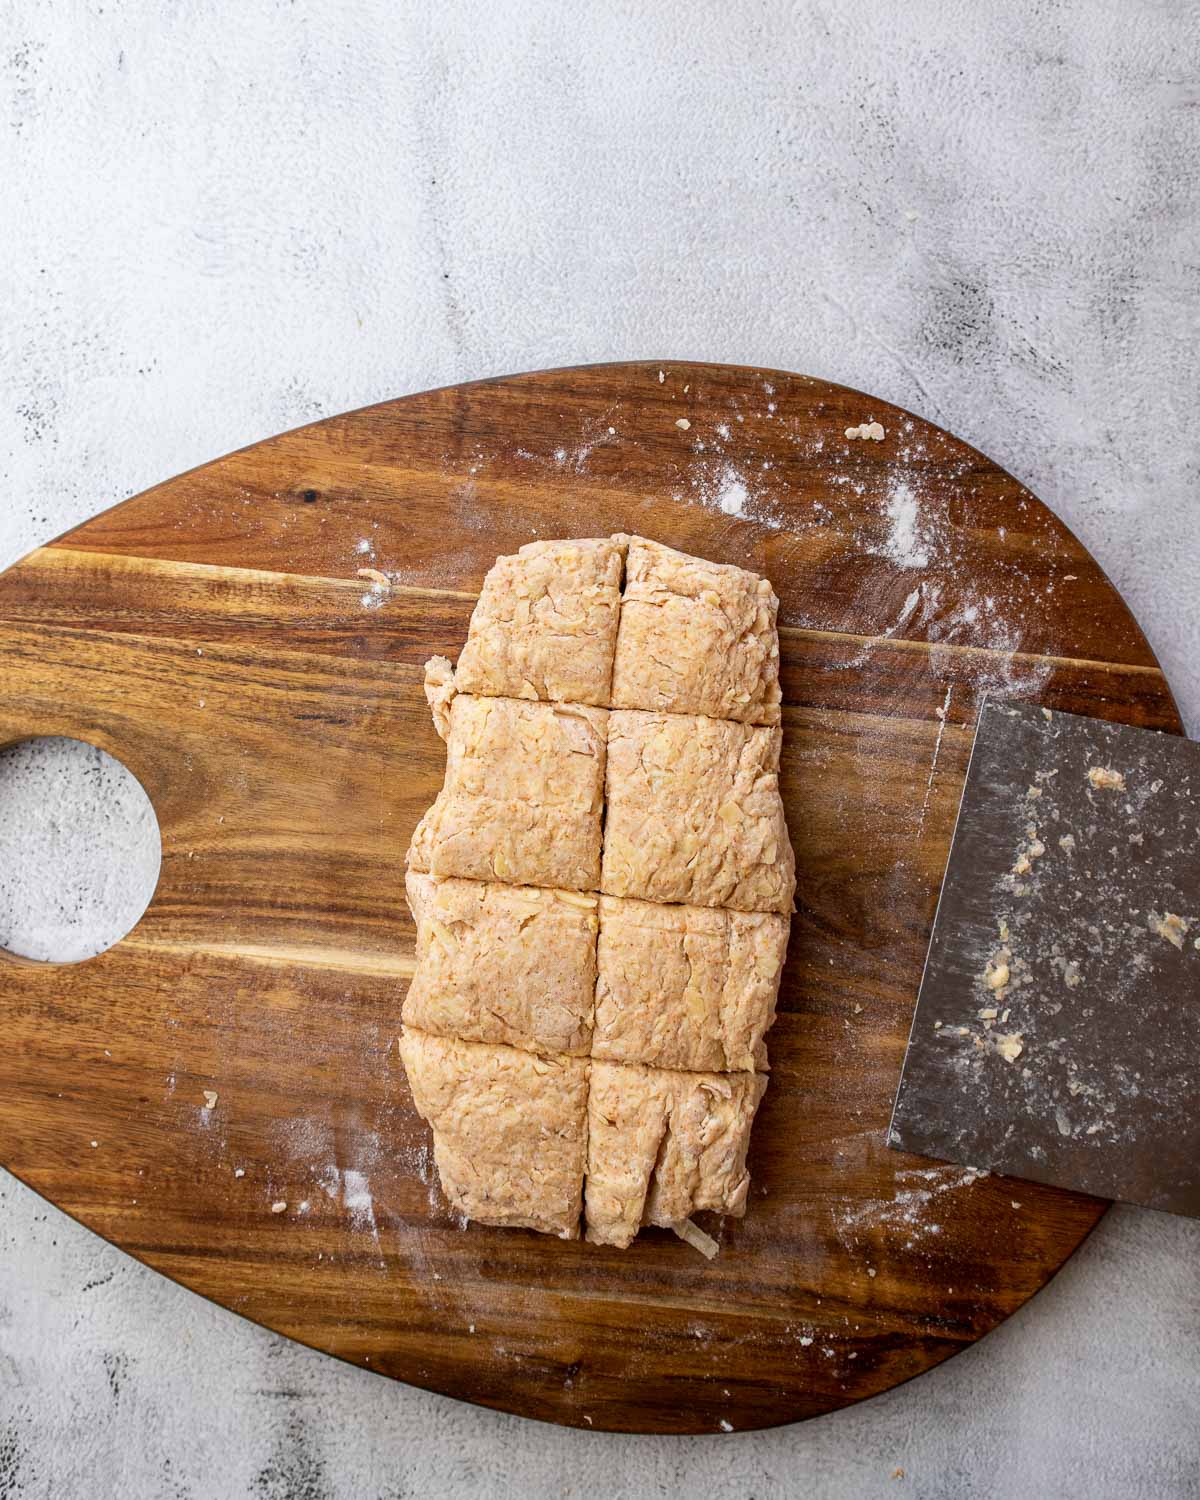
Step 5 - Place the cheese scone dough onto a lightly floured surface. Press the dough into a rectangle. Then using a sharp knife or a bench scraper, cut the dough into thirds and fold the outer edges onto the middle section. Press down using your hands or a rolling pin until the dough is about an inch or 3 cm thick. Repeat this twice.
Step 6 - Either using a cookie cutter or knife, cut 6 to 8 large scones. If using a round cookie cutter, bring together the left-over dough, by kneading the dough together and forming a disk or square to cut out additional scones. Try to work with the dough as little as possible.
NOTE - for mini cheese scones, simply divide the batter into 12-16 smaller pieces. Bake for 8 to 10 minutes.

Step 7 - Place the cut scones on the lined baking sheet. Using a pastry brush, brush the tops of the scones with the milk and sprinkle the leftover cheddar over the tops of the scones.
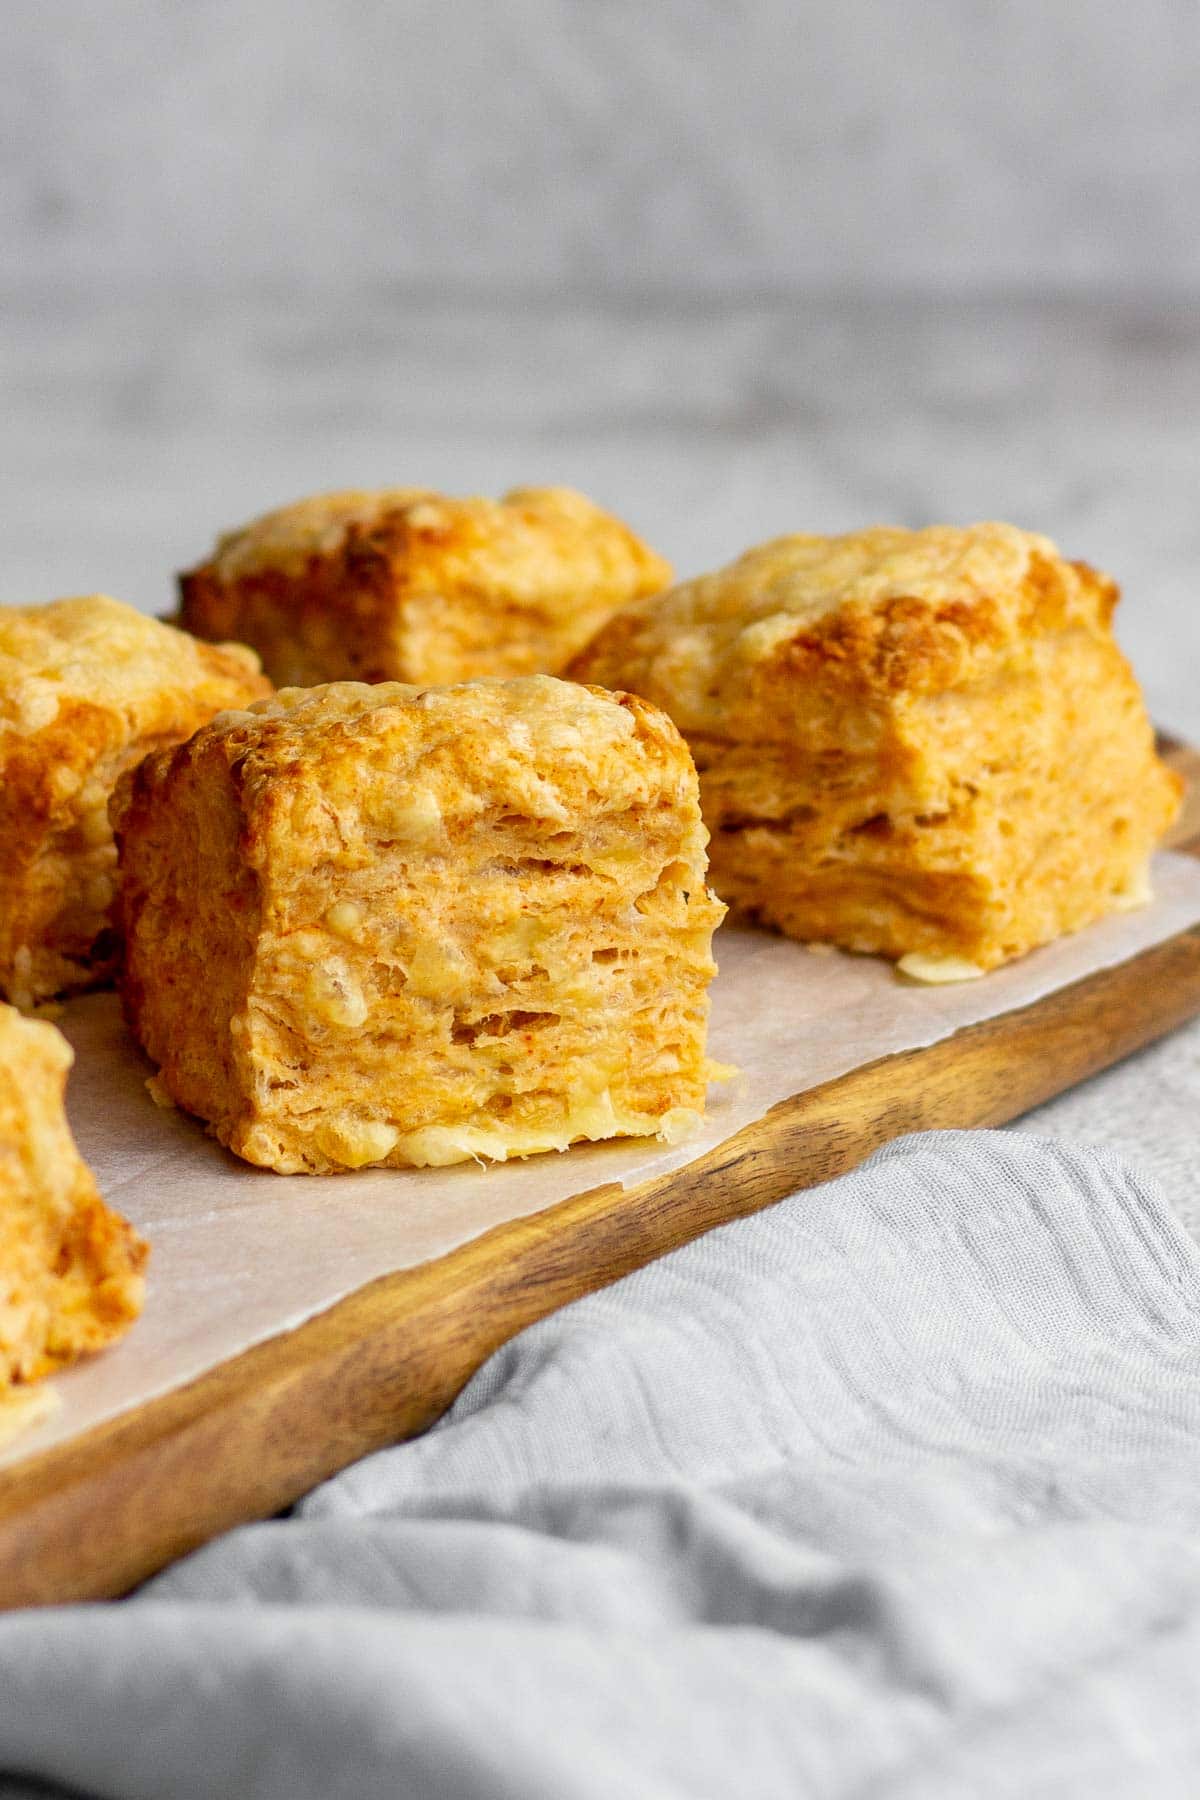
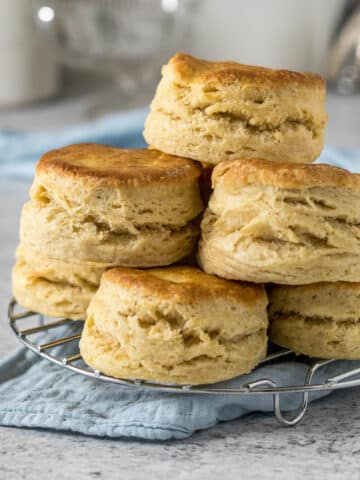
Step 8 - Bake for approximately 15 minutes. The scones would have risen, and be golden brown. Remove from the oven and place on a wire cooling rack to cool down slightly before serving warm with butter.
Expert Tips for this Recipe
For best results, use cold ingredients.
- Keep all the ingredients in the fridge until you are ready to make the scones. Grate the cheese and butter ahead of baking and pop them back into the fridge while you prepare everything else.
- If it is particularly warm, you may even want to chill your bowl. And once you have shaped your scones, place them on a baking sheet and pop them into the fridge while the oven is heating up. This is will result in extra light and fluffy scones.
- If you have warm or hot hands, handle the dough using a bench scraper.
Handle the scone dough as little as possible for light and fluffy cheese scones. Even though we are laminating this dough to an extent, keep the dough handling to an absolute minimum.
Rubbing in the butter is an important step. As the butter is rubbed into the flour, it coats the flour, which inhibits gluten formation, keeping the scones tender. The chunks of butter that are not completely rubbed in (the pea-sized pieces of butter) will also release steam when baked, leading to those soft, flakey, tender layers in the scone.
Scone dough lamination is a trick I picked up watching American biscuits being made on YouTube many moons ago. I applied this to my scones, and it works really well. It creates nice layers of butter (and cheese) which result in delicious flakiness.
Handle the scone dough as little as possible.
Make sure the oven is properly preheated before baking the scones.
Ovens and Air Fryers
The temperatures stated are for conventional ovens. For convection, fan-forced, fan-assisted, or air-fryers, the temperature must be reduced by 20°C/25°F.
For baking, make sure the oven is fully preheated, and that the rack is in the middle of the oven. Open the oven as little as possible. For best baking results use an oven thermometer.
Remember that all ovens work slightly differently and bake times may need to be adjusted for your specific oven.
Storage and Freezing
Store the baked scones in an airtight container for up to 3 days. To heat up the scones, simply pop them into the microwave for 10-20 seconds.
Scone dough can be frozen for up to 3 months. Store the cutout scones between layers of baking paper. Allow the scones to come to room temperature while the oven preheats, they don't need to be fully defrosted.
Baked scones can be frozen in an airtight container for up to 3 months. Allow the scones to defrost before serving. Scones can be heated in the microwave before serving.
Cheese Scones FAQ
Yes. Before freezing, allow the scones to cool completely before wrapping them in a reusable plastic bag (or plastic wrap) and placing them in an airtight container. Scones can be frozen for up to 3 months. Defrost the scones in the fridge overnight. Even better, freeze the scone dough and bake them from frozen, and add another 5 minutes to the baking time.
The best cheese is strong-tasting cheese like mature cheddar or vintage cheddar. However, I have also successfully made these scones using Edam and Colby cheese.
Scones can be "freshened" up by microwaving for 10-20 seconds with a small bowl of water (to moisten the scones). Or place them in an oven at 150°C for about 5 to 10 minutes, adding a bowl of water in a heat-proof container will add some moisture to the scones.
Scone dough that has been overworked will result in tough and hard scones. Work the dough as little as possible
Yes. Once you have made your dough and cut out your scones (cut into the desired shape) you can place the scones in the fridge overnight (covered in clingfilm or in an airtight container). They can be baked directly from the fridge.
More Scone Recipes You May Like


Rate & Review!
If you made this recipe, please leave a star rating! It gives my readers and me helpful feedback. If you want more recipes, subscribe to my newsletter, and follow me on Instagram, Pinterest, and Facebook!
Recipe Card
Cheese Scones
Equipment
- Baking Tray
- Bench Scraper
- Cookie Cutters
- Pastry brush
Ingredients
- 310 grams plain flour (all-purpose/standard grade)
- 3 teaspoons baking powder
- 60 grams butter salted
- 50 grams parmesan (grated)
- 100 grams cheddar (grated)
- 200 mL milk
- 3 tablespoons milk
- ½ teaspoon mustard powder (optional extra)
- ½ teaspoon cayenne pepper (optional extra)
- 1 teaspoon paprika (optional extra)
- ¼ - ½ teaspoon of table salt (if using unsalted butter)
Instructions
- Preheat the oven to 220°C/200°C Fan. Line a baking tray or baking sheet with baking paper or parchment paper.
- Grate the cheeses, keeping aside 40 grams of the cheddar to place on top of the scones before baking.50 grams parmesan, 100 grams cheddar
- In a large bowl whisk together the flour, baking powder, salt, mustard, cayenne pepper, and paprika. Grate the butter or cut it into small blocks. Rub the butter into the dry ingredients until it resembles fine breadcrumbs with some small pieces of butter scattered throughout the flour (or work the butter into the flour using a pastry cutter). Add the grated cheese into the flour, and mix through with your fingers until well distributed.310 grams plain flour, 3 teaspoons baking powder, 60 grams butter, 50 grams parmesan, ½ teaspoon mustard powder, ½ teaspoon cayenne pepper, 1 teaspoon paprika, ¼ - ½ teaspoon of table salt, 100 grams cheddar
- Pour the milk into the flour mixture, using a fork, stir to make a rough dough.200 mL milk
- Place the cheese scone dough onto a lightly floured surface. Press the dough into a rectangle. Then using a sharp knife or a bench scraper, cut the dough into thirds and fold the outer edges onto the middle section. Press down using your hands or a rolling pin until the dough is about an inch or 3 cm thick. Repeat this twice.
- Either using a cookie cutter or knife cut 6 to 8 large scones. If using a round cookie cutter, bring together the left-over dough, by kneading the dough together and forming a disk or square to cut out additional scones. Try to work with the dough as little as possible.
- Place the cut scones on the lined baking sheet. Using a pastry brush, brush the tops of the scones with the milk and sprinkle the leftover cheddar over the tops of the scones.3 tablespoons milk
- Bake for approximately 15 minutes. The scones would have risen, and be golden brown in colour. Remove from the oven and place on a wire cooling rack to cool down slightly before serving warm with butter.
Notes
- The mustard powder, cayenne, and paprika add some depth of flavor to these scones. They can be left out if you want a plain cheese scone.
- Milk can be substituted with buttermilk - but then substitute the baking powder with 1 teaspoon of baking soda.
- If using unsalted butter, add ¼ - ½ teaspoon of table salt.
- If you don't have parmesan, it can be substituted with additional cheddar, that is the total cheddar being the weight of the cheddar and parmesan combined.
- Keep all the ingredients in the fridge until you are ready to make the scones. Grate the cheese and butter ahead of baking and pop them back into the fridge while you prepare everything else.
- If it is particularly warm, you may even want to chill your bowl. And once you have shaped your scones, place them on a baking sheet and pop them into the fridge while the oven is heating up. This is will result in extra light and fluffy scones.
- If you have warm or hot hands, handle the dough using a bench scraper.
- Handle the scone dough as little as possible for light and fluffy cheese scones. Even though we are laminating this dough to an extent, keep the dough handling to an absolute minimum.
- Rubbing in the butter is an important step. As the butter is rubbed into the flour, it coats the flour, which inhibits gluten formation, keeping the scones tender. The chunks of butter that are not completely rubbed in (the pea-sized pieces of butter) will also release steam when baked, leading to those soft, flakey, tender layers in the scone.
- Handle the scone dough as little as possible.
- Make sure the oven is properly preheated before baking the scones.
Storage and Freezing
Store the baked scones in an airtight container for up to 3 days. To heat up the scones, simply pop them into the microwave for 10-20 seconds. Scone dough can be frozen for up to 3 months. Store the cutout scones between layers of baking paper. Allow the scones to come to room temperature while the oven preheats, they don't need to be fully defrosted. Baked scones can be frozen in an airtight container for up to 3 months. Allow the scones to defrost before serving. Scones can be heated in the microwave before serving.Nutrition
Nutrition information is an estimate. If scaling the recipe remember to scale your cook and bakeware accordingly. All temperatures stated are conventional, unless otherwise stated. Recipes tested in grams and at sea level.
Pin for Later

Comments
No Comments